DNS servers are one of the Internet's backbones. They link domain requests to the appropriate IP address, ensuring that the website someone is trying to visit actually loads in their browser. However, not all DNS servers are the same: Depending on the working conditions a particular DNS is operating in or encountering, for example, their bandwidth and its usage, server speed can fluctuate from service to service.
For this reason, it might be worthwhile to change the DNS server you connect to from time to time. In this article, we'll let you know what your options are, as well as how to go about configuring your system to work with a new DNS server.
Why You Should Change Your DNS Server
Most of the time, the DNS server you're automatically assigned does a good job. However, for a number of reasons, it can make sense to change it, either proactively, or to see how a new one performs in case you've recently encountered some sort of problem or difficulty:
Speed and efficiency
If you've noticed that it takes a long time for a website to load, the DNS server you're using might be experiencing too much traffic and be unable to handle all requests. Multiple server timeout connection errors in your browser are another sure sign of a DNS server issue.Privacy and security
Some DNS servers log search requests and use this data for commercial purposes. Those with strict no-log policies, on the other hand, respect their users' privacy.Circumvent DNS blocks
Should you be unable to access a particular website and receive an error message in your browser (even with an active Internet connection), it's likely blocked because it's on a filter list. To get around these, use a DNS server that doesn't filter requests.Security
Some DNS providers block websites that spread harmful content, offering some protection against cyber criminals. These blocklists (or blacklists) are often compiled by cybersecurity companies that cooperate with DNS services.
How to Change Your DNS Server
Changing the default DNS server that you connect to can be done in just a few steps, however, these vary slightly from operating system to operating system. Below, we'll show you how to do this on Windows, macOS, Android, and iOS:
Change the DNS Server on Windows
1. Head to the taskbar and click on the network symbol. Then, choose Network and internet settings.
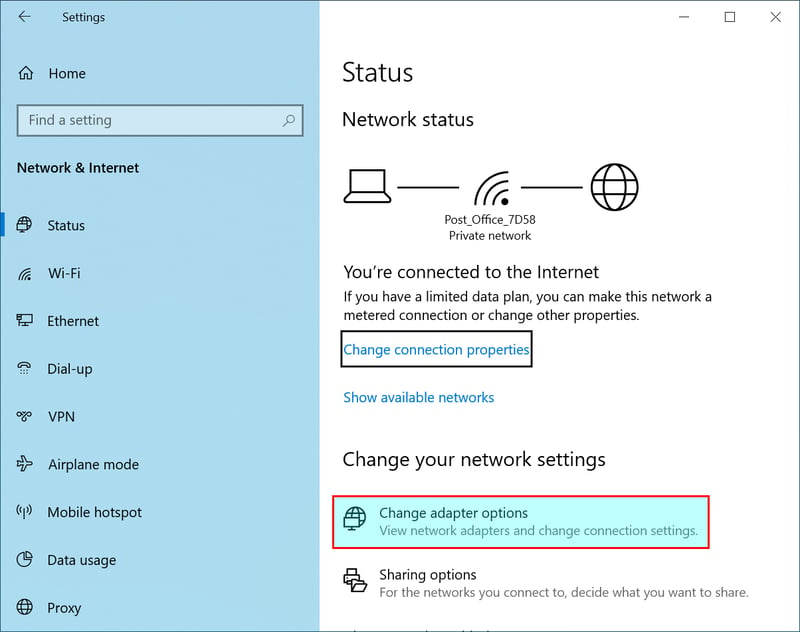
2. Select Change network settings followed by Change adapter options.

Click on Change adapter options.
3. Find your connection, right-click on it, and select Properties.
4. Click on Internet Protocol Version 4 (TCP/IPv4) or Internet Protocol Version 6 (TCP/IPv6) in the menu that opens, and then on the Properties button in the lower-right.
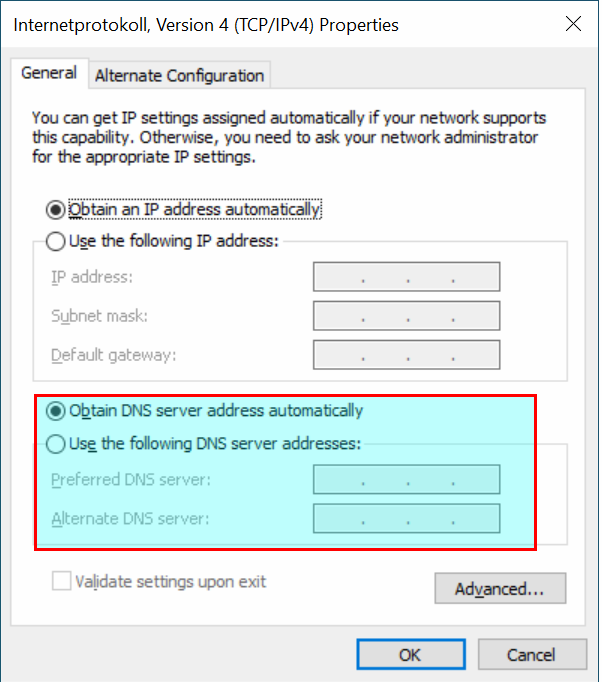
5. In the dialogue box that opens, click on Use the following DNS server addresses and input a preferred and alternate IP address.

Input the IP addresses of your preferred and alternate DNS servers.
6. Save the changes you've made by clicking on the OK button.
Change the DNS Server on macOS
1. In the upper left of the panel bar, click on the Apple symbol, and again on System Preferences in the menu that opens.
2. Look for the Network option and click on it.
3. In the window that opens, find and select your current network, then, in the bottom right, click on the Advanced Settings button.
4. Navigate to the DNS tab and click on the plus symbol in the bottom left.
5. Drag the IP address of your desired DNS server to the input field and save your changes by clicking on the OK button in the bottom right.
6. Confirm your changes by clicking on the Apply button in the network dialogue that opens.
Change the DNS Server on Android
Since the Android 9 Pie update in 2018, alternative DNS servers can be used on Android devices without having to supply a static IP address. As such, connecting to your preferred DNS server only takes a few steps:
1. Tap on Settings.
2. Select Connections followed by More connection settings.
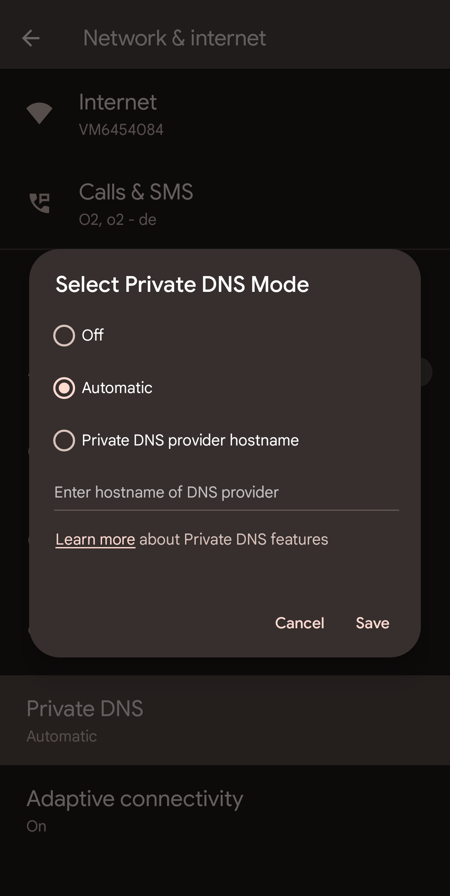
3. In the menu that opens, select Private DNS. Toggle Private DNS provider hostname. Take note that since the release of Android 9, Google only supports DNS over TLS services that permit encrypted DNS queries. Services that don't support this type of encryption cannot be used on Android devices.

Input the hostname here.
4. Input the hostname.
5. As the final step, tap on Save and close the dialogue box. Your new settings will be applied and DNS queries will be routed through the alternative service you specified.
Change the DNS Server on iOS
1. Head over to Settings and select WLAN Settings from the menu.
2. Tap on the network you're currently connected to and then on the arrow to its right.
3. In the DHCP tab, select DNS and input the IP address of your preferred DNS server(s). If inputting multiple IP addresses, separate these with a comma followed by an empty space.
4. Return to the previous page and tap on the Home button. Your new DNS server should now be activated.
Recommended Free DNS Servers
Once you've made the decision to start using a different DNS server, you'll need to select the right one. Luckily, there are lots of free options:
Fast and proven: Cloudflare
Cloudflare is one of the fastest DNS providers on the planet. Although it doesn't block dangerous websites, it does adhere to strict data privacy standards. The service's DNS server IP addresses are:
1.0.0.1 and 1.1.1.1 for IPv4
2606:4700:4700::1001 and 2606:4700:4700::1111 for IPv6
Security-focused: Quad9
Quad9 stands out owing to its multiple security mechanisms. It blocks malware using integrated filter lists, while also offering DNSSEC validation. The service doesn't save or analyze any personal user data. It uses the following IP addresses:
9.9.9.9 or 149.112.112.112 for IPv4
2620:fe::fe or 2620:fe::9 for IPv6
Unlimited Internet Access: OpenNIC
The OpenNIC project operates DNS servers in a number of countries around the world. As an NGO, the project offers unlimited Internet access. The downside to this is that it doesn't have any filter lists, removing some protection against malware, trackers, and ads. Some OpenNIC servers in the US include:
147.182.243.49 and 192.3.165.37 for IPv4
2001:550:9601::4 or 2604:a880:0:1010::b:4001 for IPv6
Fast and reliable: Google Public DNS
Google Public DNS has been offered since 2009, facilitating quick and stable DNS queries. The Internet giant does temporarily store (24-48 hours) the requesting computer's IP address. Other data, pertaining to its location, the requested domain name and answer, as well as the ISP of the requesting computer, and data about its transport protocol are stored for much longer. Google's DNS servers can be reached via these IP addresses:
8.8.8.8 and 8.8.4.4 for IPv4
2001:4860:4860::8888 and 2001:4860:4860::8844 for IPv6
No logs: UncensoredDNS
UncensoredDNS is a public DNS service that operates two servers in two countries (Denmark and the US). The non-commercial provider doesn't save any user data or filter DNS requests. Its servers can be accessed via the following IP addresses:
91.239.100.100 or 89.233.43.71 for IPv4
2001:67c:28a4:: or 2a01:3a0:53:53:: for IPv6
Conclusion
Opting for an alternative DNS server makes sense when your existing one is too slow or susceptible to service interruptions. As an added bonus, plenty of free DNS services adhere to strict no-log policies, with some also offering an extra layer of protection against malware through their usage of blocklists. And don't fear: Whatever operating system you're using, it won't be difficult to connect to a new DNS server.
FAQs
When you notice that your surfing speed is slow, or that certain websites aren't available, the problem can often be that your DNS server is overburdened. Changing to a different DNS server can also enhance your security and privacy, so long as you select a provider that adheres to a no-log policy and uses blocklists.
All major operating systems have made the process of changing your DNS server child's play. To change the DNS server of an Intranet network, you'll need to make the changes on its router. Every common router offers a guide and explanation that details how to do this.
Broadly speaking, when selecting a new DNS server, you should pay attention to its speed in answering DNS requests and reliability. Current metrics which detail these parameters, and others, for individual DNS services, can be found on websites such as https://dnsperf.com.


