Itching to use your home network when on vacation? Or maybe you need something from your company's intranet while working remotely? Regardless of where you physically are, with a virtual private network (VPN) you can connect to remote networks. These are also useful if you want to surf anonymously.
Establishing VPN connections is particularly easy with an iPhone. Below, we'll tell you how to do it, and what you should pay attention to.
A VPN is an encrypted, virtual network that serves a number of different purposes. Two of the most important are:
1. They allow you to overcome physical barriers, and connect to geographically-distant networks - for example, your company or university's intranet. This kind of VPN connection can be established on an iPhone without any additional software.
2. They make it possible to bypass geo-blocking and Internet censorship (for example, in China). For this, you need an external VPN provider.
We'll show you how to do both:
Create a VPN Connection Using Your iPhone's Settings
Creating a VPN connection using the settings on your iOS device is relatively easy.
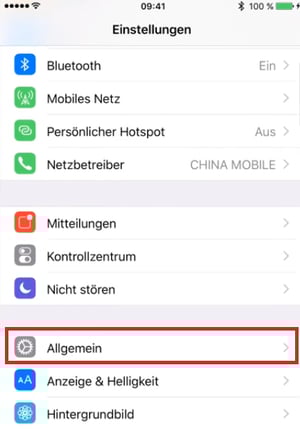
1) Open Settings and select General.
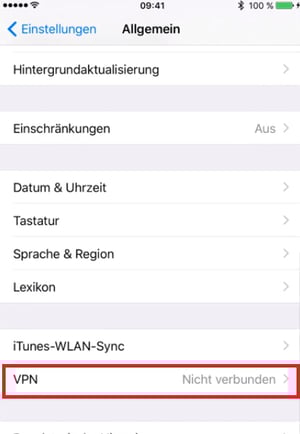
2) Scroll down to and tap on VPN.
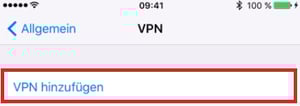
3) Select Add VPN.
4) In this window, you will need to enter some important information and name your VPN (i.e. based on its location or purpose).
Your server admin or internet provider will make this information available to you. For online services, you should receive an email containing the necessary data.
The information that must be input depends on which VPN protocol your provider uses. Below, an example with IPSec is shown:
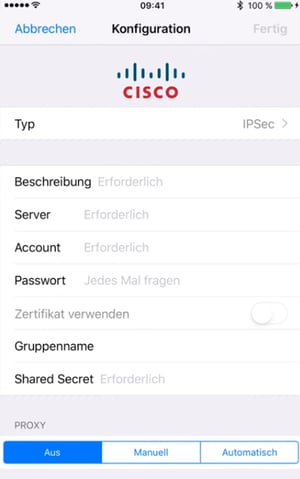
5) Once all information has been correctly input, tap on Done in the upper right of your screen.

6) Return to your network overview, and select the VPN you created from the list, sliding the Status toggle to the right (making it green).
The status should now change to Connected.
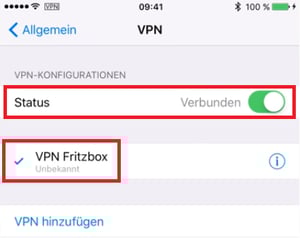
7) The appearance of a VPN icon in the status bar confirms that you are connected to the VPN network you created.

Even Easier: Connect Through Your VPN Provider's iPhone App
To surf more anonymously or bypass geo-blocking you'll need a subscription from a dedicated VPN provider. Your account credentials can then be used in Step 4 above to integrate the service on your device. For a fee, services like NordVPN and ExpressVPN offer access to VPN servers around the world.
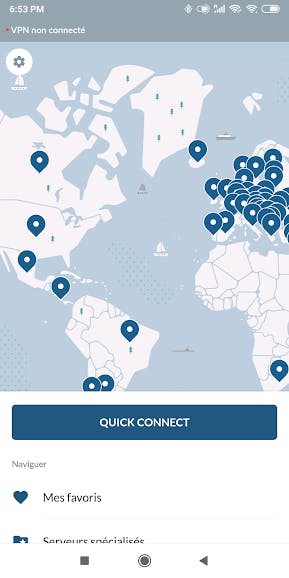
However, there's an even simpler way: Thanks to their dedicated iOS apps, VPNs make it possible to establish a secure connection within a matter of seconds, without needing to adjust your device's settings. Once installed, all you'll have to do is select a server and tap on the Connect button.
NordVPN's Android app
The best VPN providers usually charge a modest subscription fee, however, there are also freemium VPNs. With these, you'll get limited functionality, fewer servers, and a fixed amount of data per month, at no cost. These apps can be downloaded from the App Store.
In EXPERTE.com's comprehensive review, we evaluated and compared 27 of the most well-known VPN services. Our Top 5 are below:


All other contenders, as well as further details can be found here.