More and more cyber attacks are targeting how businesses and their employees use the Internet. In the fight against these, VPNs offer a useful weapon, but, how can large companies most efficiently take advantage of this technology? One option is to set up corporate VPN servers.
Below, we'll show you how, with minimal effort, you can integrate dedicated VPN servers into your business's IT infrastructure.

How Does a VPN Work - And What Can't It Do?
A virtual private network (VPN) anonymizes Internet access for whichever clients connect to it. All data packages sent from or intended for the client computer are transmitted through a virtual tunnel, with the VPN server handling their forwarding.
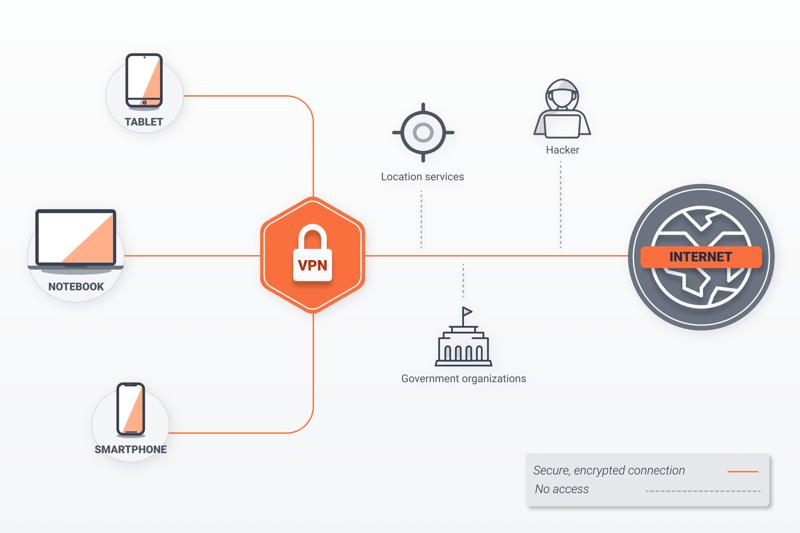
How a VPN works.
Computers not on the VPN are unable to see who the sender or recipient of the data package is. In this way, the client systems within a VPN actually enjoy greater online anonymity, since tracking software will have far more trouble making sense of their surfing behavior.
Still, it's important to keep in mind that those who use VPN services don't surf entirely anonymously: Your provider can view IP addresses and data, while others can monitor individual files and pieces of information that the VPN doesn't encrypt prior to sending.
VPN Service or Own VPN Server: Which Is Better?
For small and medium-sized businesses, publicly available VPN services are a great choice. So long as only a limited number of computers are going to use the network, costs will remain far below those that would accompany the installation and maintenance of a dedicated VPN server on-premises.
On the other hand, larger businesses, which have their own IT departments, will benefit both in terms of cost and efficiency from setting up their own VPN server. In this scenario, your business won't be dependent upon any external third parties, and the in-house VPN server can be easily integrated into your company's existing IT security architecture and philosophy, with minimal maintenance required.
How To Set up a VPN Server
There exist a number of ways to set up your own VPN server. Which you should use depends entirely upon what it is that you intend to do and the operating system or router you're using.
Affordable Single Board Computer: VPN Server on a Raspberry Pi
With a Raspberry Pi, you can take your network with you everywhere. We've created a comprehensive EXPERTE.com guide, showing just how easy it is to set up a VPN on a Raspberry Pi!
The Safe, Open Source Option: VPN Server on Linux
For Linux, a free operating system, there are also plenty of VPN solutions that are easy to install and maintain. These have the added benefit of using an open development model, which means that security problems can be localized and addressed quicker than is the case with proprietary software.
In addition, with free software like Linux, you'll be able to rest assured that no backdoors have been written into the program that might allow unauthorized third parties to gain access to your VPN's data traffic. As a result, Linux-based solutions should be the first choice for in-house, DIY VPN servers.
When directly comparing Raspberry Pi and Linux on a regular computer as the basis for a VPN, the greater energy consumption of the latter stands out.
Since VPN servers are usually online 24/7, a computer will use far more electricity than a small Raspberry Pi.
For that reason, if you're going to use Linux for your VPN server, try to get as energy efficient a computer as possible.
Which Protocol: OpenVPN or WireGuard?
Still, there are reasons to expect the relatively young VPN protocol to catch up, as it offers several notable advantages in comparison to OpenVPN: Its speeds are noticeably higher, while its code is more streamlined. In addition, WireGuard is already integrated into the Linux kernel, which boosts its working speed considerably.
Advantages and Disadvantages of OpenVPN
OpenVPN has been available for around 20 years, during which it has cemented a rightful place as the standard for VPN connections. The protocol has a number of advantages, but also some disadvantages:
Very stable
Considered secure owing to its support of many cryptographic algorithms
Highly customizable/configurable
Declared safe by frequent, detailed independent security audits
Comparatively slow owing to its more robust encryption
Advantages and Disadvantages of WireGuard:
WireGuard is widely seen as the VPN protocol of the future. Below, we've provided an overview of its advantages and disadvantages:
Very fast
Programmed compactly with far less code than OpenVPN
Integrated in the Linux kernel allowing it to be used across multiple platforms
Performs well even when there is poor network coverage
Energy-saving sleep mode
Development on Windows is lagging
Still considered experimental (by its developers)
Guide: Set Up and Configure a VPN Server with OpenVPN
In order to set up your own VPN server, you'll need to fulfill a few prerequisites. For the VPN server to be able to connect to the Internet, a static IP address is necessary. Since most Internet providers change their clients' IP addresses every 24 hours, we recommend using a dynamic DNS (DynDNS) service.
There are lots of different DynDNS services which can assign your router a fixed hostname. Whenever a new IP address is assigned, this will automatically forward users to it. To ensure this, you'll need to configure your router. In addition, it will also be necessary to go to the router's settings and make sure that port 1194 is open since this is what OpenVPN uses. Finally, the VPN server must be assigned a fixed IP address in your Intranet.
Once complete, you can install an OpenVPN server on a computer connected to your Intranet.
Ubuntu and Derivate
For the server's operating system, install Ubuntu version 20.04. This comes with long-term support and is considered to be particularly stable and secure. Once installed, load the OpenVPN server from the software archive and configure it to your preferences. To do this in Ubuntu 20.04, open Prompt with administrator privileges and execute the following commands:
Your server has now been installed and will be activated immediately. You should receive two IP addresses in Prompt for opening the Web interface, as well as the password for access to the configuration dialogue. Note these.
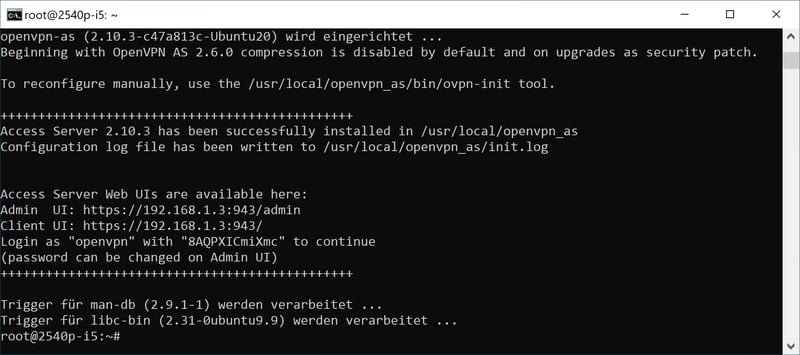
You've now installed a VPN server.
After that, input the URL provided for administrator access into your Web browser's address bar on any computer connected to your Intranet. Open the configuration dialogue with the username openvpn and the password which you received from Prompt. Next, you'll be asked to confirm your license in an administrative dashboard.
Basic Configuration
In the next step, you'll have to add the DynDNS service to OpenVPN, so that the server will be accessible from outside. To do this, click on Configuration which is to the left of the vertical column in the dashboard, followed by Network Settings which opens below it.
Look for the local IP address of the VPN server in the Hostname or IP Address field. Change this to your DynDNS address. When complete, scroll to the bottom of the page and confirm your changes by clicking on the Save Settings button.

In this step, you'll need to replace the VPN server's IP address with your DynDNS address.
Guide: Set Up and Configure a VPN Server with WireGuard
WireGuard comes with Ubuntu 20.04's package source, making it easy to install on a system, without having to integrate a new software archive. Since WireGuard doesn't follow the traditional client/server principle, but rather, sets up a point-to-point VPN server, its clients are authenticated through asymmetric cryptographic infrastructure. For that reason, it's necessary for both the WireGuard server and the client to generate public and private keys.
Setting up a WireGuard server is somewhat more complicated than an OpenVPN one. Start by updating your operating system with the command:
Then, should you not already have it, install Iptables:
Next, install the WireGuard server:
In the following step, you'll generate the keys using wg, the WireGuard command:
With the command:
You can check whether both keys have been correctly generated.
After that, set up the WireGuard network interface. This is where the VPN server is addressed. For configuration, use the text editor Nano. Execute the following command in Prompt:
The configuration file is now empty. To create the interface, input the following lines in the editor:
When finished, save your settings by pressing Crtl+O followed by Crtl+X. Once the interface's IP address and port number have been input, the rules established by Iptables for forwarding data packets will be defined. Pay close attention to upper and lowercase letters!
Should your system have multiple physical network cards installed, you might need to change the interface's name (here, eth0). In order for the correct interface to be supplied, use the command ifconfig. If an error message appears, you'll have to reinstall the net-tools packet with the following command:
Should the configuration file have been input correctly, in the next step, you'll specify the rights for the interface file and the private key:
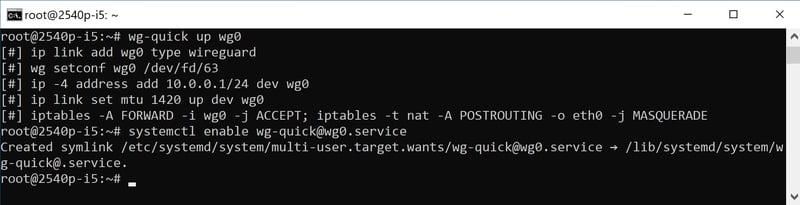
Activate the new interface, wg0, with the following command:
After which you should receive the following:

You have now activated the new interface.
Automatically Start Your VPN Server
In order to automatically start your new VPN server with WireGuard when your computer boots up, you can activate it as a Systemd-Service. To do this, input the following command in Prompt:
systemctl enable wg-quick@wg0.service
After this, you should receive the following notification:
Make sure that the VPN server automatically starts when your system boots up.
The service does not need to be restarted. In order to check the status of your VPN server, use the systemctl command:
The final step is to activate IP forwarding so that data packets from the client systems are transferred to the Internet. To do this, you'll again use a text editor like Nano to open the file/etc/sysctl.conf. Look for the line:
and remove the # sign in front of it. Save the modified file and restart your system. Your server is now ready for use and you can start configuring the necessary clients.
Connect to the VPN
In order to connect with the VPN from your workplace computer over Intranet, you'll need to create a VPN profile in Windows. To do this, go to Start > Settings > Network and Internet > VPN and click on the first option, Add a VPN connection.
Select Windows (integrated) from the VPN Provider field that opens, supply a name for your connection, and input the server name or its IP address in the appropriate areas. After that, select the login information type, and if necessary, provide the username and password.

You can now connect to your VPN via Windows.
After clicking on the Save button and closing the settings dialogue, you can activate the VPN connection in the bottom right of the system tray by finding the connection from the list and clicking on Connect.
Conclusion
If you'd like to set up a dedicated VPN server, you can save your company quite a bit in comparison to external VPN services.
Linux-based servers are ideal since they offer a low-cost VPN solution, which also won't consume large amounts of time or other resources. In addition, since their source code is accessible, they provide enhanced security and data control for their operators who want to make sure that information is kept under one roof.
The only issue that might arise would be the somewhat complicated installation process, which some IT staffers and admins could find unfamiliar or tedious. Our step-by-step guide should make this as clear as possible though, and help to get you started on the right foot.