How to Secure Your WordPress Site: 8 Steps to Improve Security


WordPress is a frequent target for cyberattacks. Hackers typically exploit weak passwords, outdated plugins, or misconfigured installations. That doesn’t make WordPress inherently insecure. With the right precautions, you can protect your site effectively.
This guide walks you through the essential steps to secure your WordPress website. The goal is to eliminate common vulnerabilities, reduce avoidable risks, and strengthen your site’s defenses over the long term.


Most attacks target known vulnerabilities. Keep your WordPress core, themes, and plugins updated at all times.
Weak passwords, outdated extensions, and excessive user permissions are among the most common causes of security breaches. All of them are preventable.
A combination of SSL encryption, two-factor authentication, and regular backups significantly increases your level of protection.
If you apply updates consistently, review user permissions, and test your setup regularly, your WordPress site will remain secure in the long run.
How to Secure Your WordPress Site: What Really Matters
WordPress security doesn’t start with expensive plugins. It starts with a few clear principles. Your goal is to minimize the attack surface and systematically eliminate common vulnerabilities.
WordPress isn’t targeted because it’s less secure than other systems. It’s targeted because it’s highly visible. No other content management system has a larger global market share.
Here are 8 practical steps to secure your WordPress website:
Use Strong Passwords
Weak passwords are one of the most common reasons WordPress sites get compromised. Attackers frequently automate login attempts using leaked password lists.
Installations that use default usernames like "admin" or a domain-based login are particularly vulnerable. In such cases, attackers already know half of the credentials.
By default, WordPress does not block these attack patterns. You must establish basic protection by enforcing secure login credentials.
What Makes a Password Secure?
A strong password is long, random, and unique. It should be at least 16 characters and include uppercase and lowercase letters, numbers, and special characters. Avoid dictionary words, names, birthdates, keyboard patterns such as qwertz123, and common combinations.
Use the following checklist. A strong password should meet all of these criteria:
For example: "Tent!Lion89Sky+Tunnel3" meets these criteria. It is significantly harder to crack than a short, complex-looking string like "Xg9$2hA".
You can check your password strength with our password checker:

Pay attention to WordPress’ built-in strength indicator when changing your password:
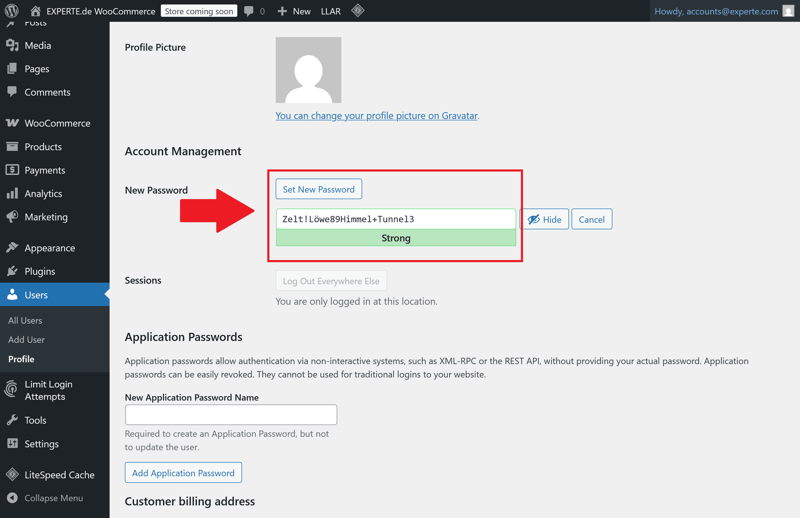
WordPress confirms whether your password meets the required strength.
Enforce Password Rules for All Users
Clear rules are essential if multiple users have access to your WordPress installation:
- 1.
Every user gets their own strong password. Avoid shared admin accounts.
- 2.
Delete or deactivate inactive accounts. Unused accounts with high-level access are among the most dangerous vulnerabilities.
- 3.
If you grant temporary access—for example to agencies or freelancers—remove or deactivate the account once the project ends.
Don’t forget: FTP, hosting, and database credentials also require strong passwords. Your WordPress installation is only as secure as the infrastructure behind it.
Limit Login Attempts
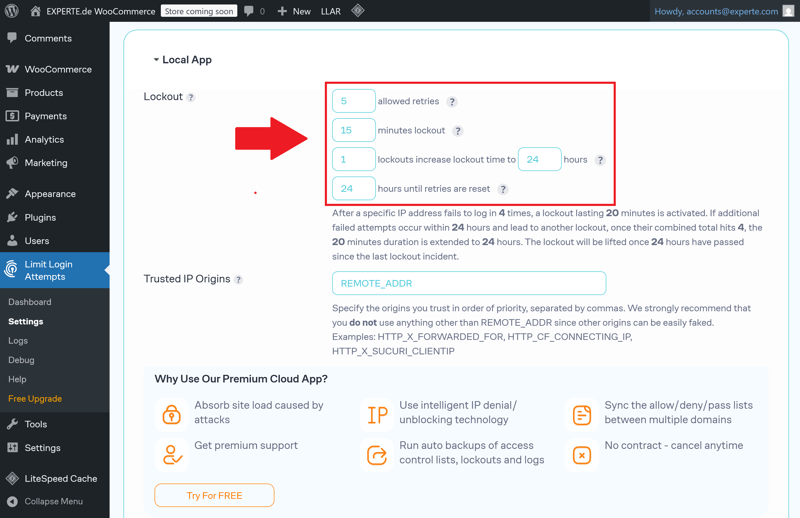
By default, WordPress allows unlimited login attempts—making brute-force attacks easier. You can restrict attempts using security plugins such as Limit Login Attempts Reloaded. These extensions lock out users or IP addresses after several failed attempts.
Example: User lockout after 5 failed login attempts.
Configure login limits as follows:
Allow a maximum of 5 failed attempts within 15 minutes
Lockout duration: 1 hour or longer
Block IP addresses after repeated failed attempts
Enable logging and notifications for repeated failed login attempts
Learn how to protect your website even better against brute-force attacks in this article:
Enable Two-Factor Authentication
Two-factor authentication (2FA) is one of the most effective security measures for WordPress. It protects against stolen passwords, automated login attempts, and many phishing attacks. Setup requires only minimal effort.
2FA adds a second, independent verification factor to your password. Access is granted only after both factors are verified. A stolen password alone is no longer sufficient to access your WordPress dashboard.
How Two-Factor Authentication Works in Practice
2FA combines two different types of credentials. In most cases, these are:
- 1.
something the user knows (the password)
- 2.
something the user has (usually a time-based one-time code)
The one-time code is typically generated by a smartphone app or delivered via email:
With app-based authentication, an authenticator app generates time-based codes that refresh every 30 seconds. These codes are generated locally on your device and do not require an internet connection. This method is considered especially reliable.
With email-based authentication, a one-time code is sent to your registered email address. This method is easier to configure but only as secure as the associated email account. It is better suited as a temporary solution or for users with limited access rights.
Several established plugins allow you to add two-factor authentication to WordPress. Two widely used options are WP 2FA and Two-Factor.
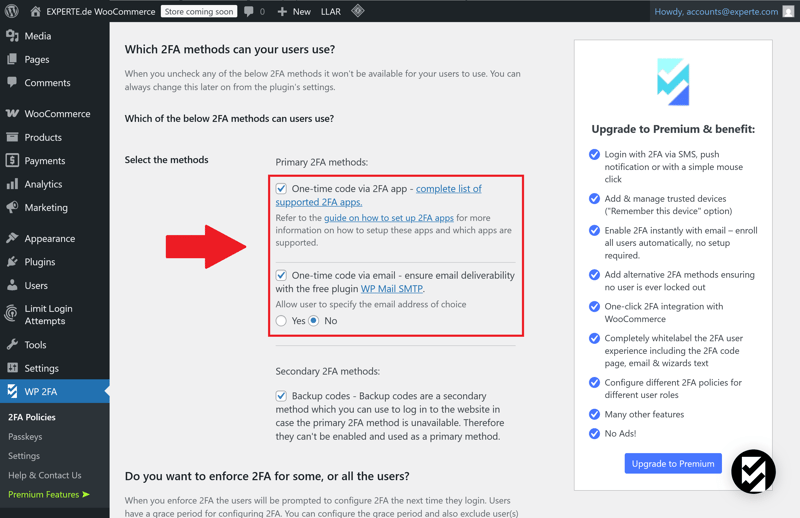
App-based and email-based authentication methods in WP 2FA.
These plugins integrate directly with WordPress user management and support multiple 2FA methods. They also allow you to enforce 2FA based on user roles.

Keep WordPress and All Components Up to Date
Outdated software is one of the most common causes of WordPress security breaches. This applies not only to the WordPress core but also to plugins, themes, and language files. Developers regularly discover security vulnerabilities and release updates to fix them.
Once an update becomes available, attackers analyze the patch and target installations that remain unpatched. Delaying updates increases your attack surface.
Enable Automatic Updates
Since WordPress 5.5, you can enable automatic updates for plugins and themes. For WordPress core security updates, this feature has been available since version 3.7.
Automatic updates close security gaps quickly but reduce your control over potential compatibility issues.
For live websites, a balanced approach is recommended:
Enable automatic updates for stable, low-risk plugins
Update critical plugins manually after testing them in a staging environment
Create a full backup before every update
Verify your site’s core functionality after each update
A staging environment allows you to test updates in a realistic setup without affecting your live site. Many professional hosting providers include this feature as part of their standard plans.
Delete Deactivated Plugins Completely
A deactivated plugin is not harmless. As long as it remains on the server, its code can still be accessed or exploited—for example through direct URL requests.
The rule is simple: Delete unused plugins and themes instead of merely deactivating them. This also applies to test installations, duplicate setups, or plugins that no longer serve an active purpose in the dashboard. Any unnecessary code on your server increases risk.
Consider Managed WordPress Hosting Services
If you lack the internal resources for maintenance and updates, managed WordPress hosting can be a practical alternative. With this hosting model, the provider manages the technical maintenance of your WordPress installation. This typically includes:
regular WordPress core updates
plugin and theme updates
backups at scheduled intervals
security scans and performance monitoring
Managed hosting does not remove your responsibility for user management, content security, permission settings, or selecting secure plugins. You remain responsible for reviewing and removing unused components.
We tested 10 WordPress hosting providers in detail. Here is our ranking of the top providers, including links to our in-depth reviews:


Enable SSL/TLS Encryption
If your website is still accessible via HTTP, all transmitted data remains unencrypted. This includes passwords, form submissions, session cookies, and user information.
The risk: Any node between the user and your server can intercept or manipulate this data. This includes public Wi-Fi networks or compromised infrastructure along the connection path. Without SSL/TLS encryption, no website is secure—even if all other security measures are implemented.
HTTPS, SSL, and TLS: What’s the Difference?
HTTPS encrypts communication between the client and server. This SSL encryption relies on a TLS certificate issued by a trusted certificate authority.
The certificate verifies that the domain belongs to your server and ensures that traffic is encrypted. Once a valid certificate is installed, your site becomes accessible via HTTPS.
Most hosting providers now offer free TLS certificates via Let's Encrypt. These certificates are valid for 90 days and renew automatically as long as the configuration is maintained properly.
Paid certificates remain available but are typically reserved for specific requirements such as extended validation or wildcard coverage.
Activate SSL in Your Hosting Account
Most hosting providers allow you to activate an SSL certificate directly from the control panel. Depending on the provider, this can happen automatically or manually. After activation, switch your website to HTTPS.
This involves several steps:
- 1.
Activate the SSL certificate in your hosting panel
- 2.
Change WordPress URLs to https://
- 3.
Redirect HTTP requests to HTTPS
- 4.
Resolve mixed content issues in themes or plugins
- 5.
Optionally enable HSTS to enforce HTTPS connections
Update Your WordPress URLs
In the WordPress dashboard, go to "Settings" > "General" and change both the WordPress URL and the Site URL to the HTTPS version. This ensures that internal links, media paths, and canonical tags use HTTPS consistently.
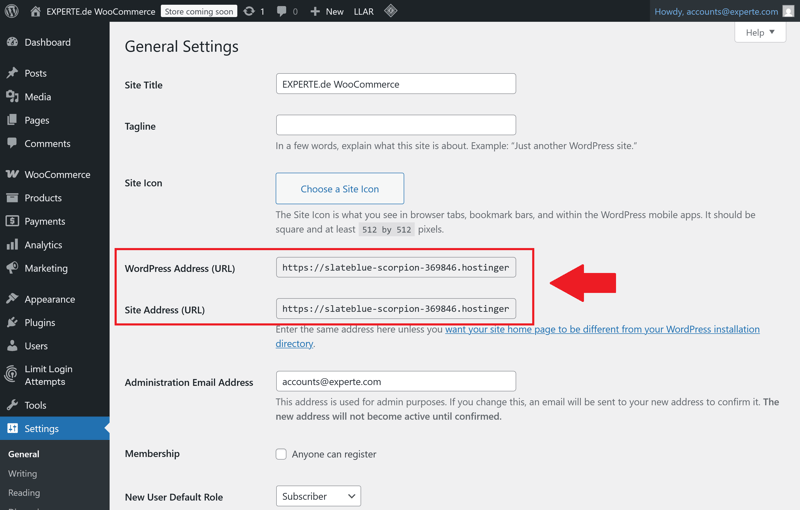
HTTPS in WordPress URLs.
If the configuration is incomplete or caching issues persist, mixed content warnings may occur. This happens when CSS or JavaScript files are still loaded over HTTP. The result: browser security warnings or blocked resources.
The following tools can help resolve these issues:
SSL plugins such as Really Simple Security that detect and fix mixed content
Online testing tools such as Why No Padlock or Qualys SSL Labs
For advanced users: manually replacing outdated http:// paths in the database
Implement DDoS Protection
A Distributed Denial of Service (DDoS) attack does not target classic security vulnerabilities. Instead, attackers attempt to take your website offline by overwhelming it with massive volumes of traffic.
It is purely an availability attack: the server becomes overloaded to the point where legitimate visitors no longer receive a response. The result is downtime or significant performance degradation.
WordPress does not provide built-in DDoS protection. You must address this at the network level—using content delivery networks (CDNs) or dedicated server configurations.
How a DDoS Attack Works
A typical DDoS attack relies on a botnet—a network of compromised devices worldwide that send simultaneous requests to the target. These requests may consist of simple HTTP calls or more complex payloads that target resource-intensive WordPress components.
Typical signs of an ongoing DDoS attack include:
Your website becomes extremely slow or temporarily unreachable
Server load increases abruptly
A high volume of requests originates from specific IP ranges
Log files reveal repeated, automated request patterns
Depending on the attack type, elevated traffic levels can persist for hours or even days.
Use a Content Delivery Network (CDN) for Protection
The most reliable defense against DDoS attacks is a network layer that filters, analyzes, and distributes traffic before it reaches your server. A CDN performs exactly this function.
A CDN offers several advantages for DDoS mitigation:
Malicious traffic is intercepted at the global network level
Load is distributed across multiple edge servers
Even complex attack patterns can be identified and mitigated
No modifications to WordPress itself are required
Integration typically involves updating your DNS records. Once configured, all traffic passes through the CDN, where it is inspected before being forwarded to your origin server.
Protect Vulnerable WordPress Endpoints
Certain WordPress endpoints are particularly vulnerable to abuse:
wp-login.php
xmlrpc.php
wp-json/ REST API
Restrict or protect access to these paths:
Security plugins such as Wordfence or Solid Security provide these configuration options. They detect suspicious activity patterns and automatically block known attack sources.
Set Up Regular Backups
Backups are not optional—they are essential. A reliable backup system determines whether you can quickly restore your WordPress site after an attack, technical failure, or human error.
A complete WordPress backup consists of two components:
Files: themes, plugins, media library, configuration
Database: posts, pages, settings, users
Both components are required for a full restoration. A file backup alone is insufficient without the database. Likewise, a SQL dump without the corresponding wp-content directory is incomplete.

The 3-2-1 Backup Rule
A proper backup strategy must ensure two things:
- 1.
The ability to restore a stable, functional version of your site
- 2.
Access to an uncompromised backup—even if the production server has been breached
This results in clear requirements regarding how backups are structured, scheduled, and stored. The 3-2-1 rule outlines a proven backup strategy:
3 copies of your data
2 different storage types (e.g., cloud backup and local)
1 copy stored outside the production environment
Backups stored exclusively on the same server are ineffective if that server fails or is compromised. Your backup must be physically or logically separated from the production environment.
In this video, Alex demonstrates how to create a WordPress backup using Hostinger:
Restrict User Permissions Strategically
Software vulnerabilities and external attacks are not the only risks to a WordPress site. Internal user accounts can also pose a significant risk. Every unnecessary permission increases your attack surface.
Forgotten, outdated, or unmonitored administrator accounts are particularly dangerous.
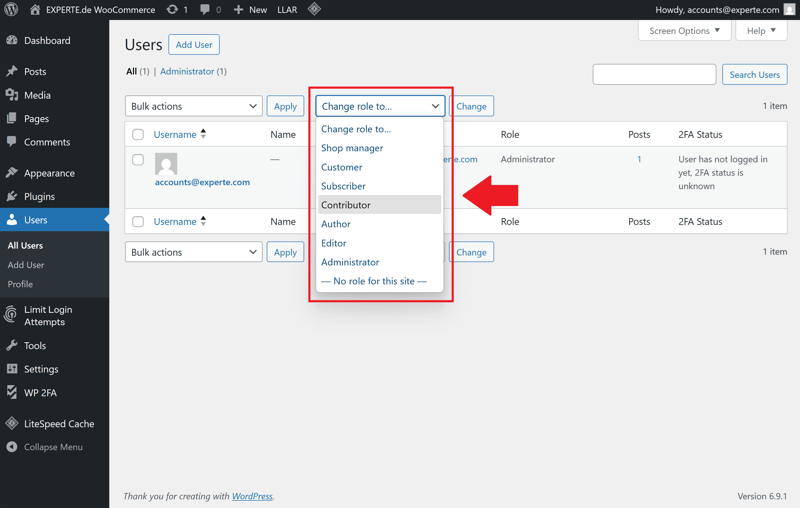
User roles can be adjusted at any time.
Apply the Principle of Least Privilege Consistently
Each WordPress user should only have the permissions required for their specific role. This principle limits potential damage if an account is compromised.
An editor doesn't need access to plugins or themes.
Deactivate or remove administrator accounts that are no longer actively used.
WordPress includes five default user roles with varying access levels:
Role | Description |
|---|---|
| Full access to all features, including plugin installations |
| Access to all content, including publishing and deleting |
| Can publish their own posts |
| Can write posts but not publish them |
| Can manage their own profile but has no content permissions |
Give Every User Their Own Account
Shared login credentials represent a significant security risk. They prevent clear activity tracking and undermine accountability. Every user should have an individual account—even for temporary access.
When working with agencies, freelancers, or guest authors, use a structured access process:
- 1.
Define a clear time frame in advance
- 2.
Document all granted permissions
- 3.
Review the work after completion
- 4.
Revoke access immediately after the project ends
Scan Your Site for Malware
Not every attack on a WordPress site is immediately noticeable. Modern malware often operates silently in the background. It may install backdoors, manipulate content, or extract sensitive data.
Without regular scans, infections may remain undetected for weeks or even months. During that time, the damage escalates: data may be stolen, visitors redirected to malicious websites, and search engine rankings negatively affected.
A malware scan identifies common indicators of tampering. These often include:
modified core files
injected scripts in themes or plugins
hidden iframes or redirects
suspicious user accounts with admin privileges
malicious code in posts, widgets, or database fields
The earlier you detect these issues, the less damage they cause. Regular malware scans are an essential component of WordPress security. Dedicated security plugins can assist with this process.
Use Dedicated WordPress Security Plugins
Wordfence and Sucuri Security are established WordPress plugins for malware detection. Both provide detailed analysis and clear recommendations when suspicious changes or infections are detected.
Wordfence
scans core files, themes, and plugins for integrity
detects known malware patterns
scans posts and comments for suspicious URLs
provides real-time monitoring and IP blocking
distinguishes between legitimate changes and indicators of an attack
Sucuri Security
compares files against original source versions
detects file tampering, web shells, and encrypted code injections
offers remote scanning independent of your hosting environment
includes a website firewall module (WAF, premium feature)
provides detailed reports and remediation options
Malware Detected: What to Do Next
When malware is detected, immediate action is required. A structured response minimizes recovery time and limits further damage. Here's how to proceed:
Step 1: Immediately take the website offline and block external access.
Step 2: Identify a verified clean backup.
Step 3: Replace compromised files or restore the entire installation from backup.
Step 4: Change all user passwords along with database and server credentials.
Step 5: Update WordPress, plugins, and themes to the latest versions.
Step 6: Review server logs to determine how the infection occurred.
Step 7: Run a comprehensive security scan after restoration is complete.
If no clean backup is available, perform a manual cleanup. This includes removing suspicious files, cleaning manipulated database entries, and eliminating malicious code injections.
Conclusion: WordPress Security Requires Ongoing Attention
Your WordPress site is only as secure as the measures you implement. Because attackers typically exploit simple vulnerabilities, you can significantly reduce risk by following a few fundamental security practices. Keep your system up to date, use strong credentials, and create regular backups.
Long-term security is not a one-time task. It requires continuous attention. You must regularly review, secure, and maintain your WordPress installation. If you integrate these tasks into your routine, your website will remain stable and secure.
If you prefer not to manage updates and backups yourself, managed WordPress hosting can be a practical solution. The provider handles many technical maintenance tasks and helps keep your website running reliably.