If your WordPress website doesn't have SSL encryption, you're not only putting your visitors at risk: Search engines, like Google, penalize this kind of oversight, and it can even impact your site's performance. There's no better time to make the transition to SSL, and thankfully, doing this on WordPress isn't too tricky.
Below, we'll let you know what SSL encryption is, why you should use it, and how to integrate it into your WordPress website in just 6 easy steps.


SSL (Secure Sockets Layer) is an encryption protocol that enables secure online data transfers.
WordPress websites with SSL encryption aren't only safer, but they also rank higher on Google and load faster.
Adding SSL to your WordPress only requires a few steps: Get and install an SSL certificate for your domain, and then update your URLs, permalinks, and database in WordPress.
SSL and HTTPS: What Are They?
Secure Sockets Layer (SSL), is a security protocol that allows data to be safely transferred between website servers and browsers. Whenever SSL encryption is active, a lock symbol appears in your browser's address bar, and/or the URL starts with https:// as opposed to http://. HTTPS, which is short for "Hypertext Transfer Protocol Secure", is a transfer protocol that uses SSL encryption.
When using net banking or making a payment in an online store, information is shared between your browser and the domain you're accessing. SSL ensures that sensitive data, like your login or payment details, are transferred securely and kept away from third parties. These days, SSL has become popular among regular websites too, owing to the higher degree of security and trustworthiness it indicates.
Browser Warnings
Websites that don't use an SSL certificate are comparatively unsafe and marked as such by most browsers. In Chrome, an exclamation mark appears in the address bar. Clicking on this displays the following warning, written in red:

Whenever a website you want to visit doesn't use SSL encryption, you'll see a message like this.
On the other hand, if a website uses SSL, a closed lock icon appears in your browser's address bar. In Chrome, this indicates that your connection is secure:

This connection uses SSL and as such, is secure.
Why You Should Switch to SSL
Regardless of whether you're selling products and services or working with sensitive data, there are many reasons to switch to SSL. Some of these include:
Google penalizes websites without SSL
You probably pay close attention to how your website performs in Google's organic search results. Since 2014, Google ranks websites with SSL higher than those without it, so integrating it can give your ranking a boost.Browsers mark unencrypted pages as unsafe
Plenty of browsers, like Google Chrome, display alerts in front of the domain whenever a website is unsecured. This is offputting for visitors and a red flag for potential customers, many of whom will (rightly) think twice about sharing their data or hard-earned money with you.Speed boost through HTTP/2
Many hosting companies offer the HTTP/2 protocol to websites that use SSL encryption. This allows for requests to be made and fulfilled parallel to one another, considerably reducing loading times for images and other content. The bottom line: Your website gets a noticeable performance boost.Online store certificates require SSL
Customers usually look for payment certificates (like "Verified by Visa") when preparing to make their first purchases online from an unknown business. If your online store doesn't use an SSL certificate, you won't be able to get these.
So, SSL certificates offer both enhanced security and site performance: If you haven't added them to your website or online store, there's no better time than the present. Below, we'll let you know exactly how to do it.
Switch to SSL in WordPress: 6 Easy Steps
Switching a WordPress website to SSL is fairly simple and doesn't require much technical know-how. We've summarized the most important steps below:
Create a Backup
Stay on the safe side and create a WordPress backup. That way, in case something goes wrong, you can easily restore your website to the way it was. To find out how to do this, check out our guide here:
Request and Install an SSL Certificate
The main thing that a website needs to be encrypted is a unique, domain-specific SSL certificate, which is installed on its web server. It's best to get this directly from your hosting provider since you'll need to configure it in your account there.
A number of providers support Let’s Encrypt, a free service that offers SSL security at no cost. Alternatively, paid options do exist for SSL certificates.
The exact steps needed to activate SSL on your WordPress website vary from provider to provider. With Bluehost, for example, you can do so directly in the page settings menu:
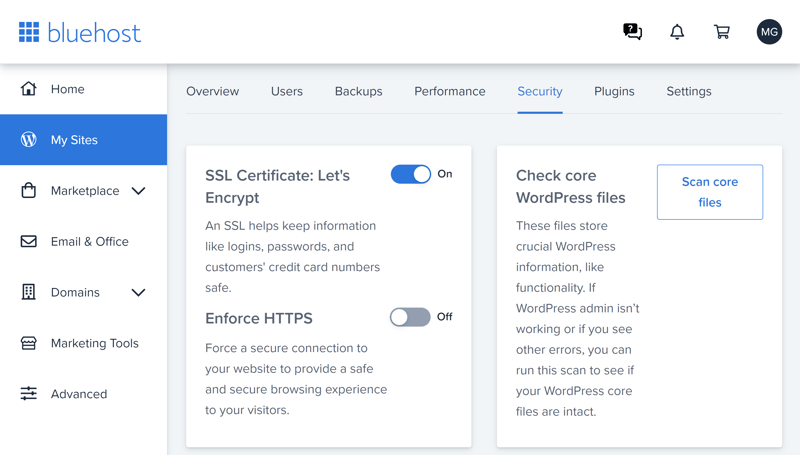
Many hosting companies support the free SSL certificates that Let's Encrypt offers.
Should you be operating your own server, you'll have to set up and install your SSL certificate in the backend, for example, with Plesk. We recommend looking for a guide tailored to your situation and software.
Update URLs and Permalinks
Even after installing the certificate, your WordPress website won't be accessible via https. To change this, update your URLs in WordPress to https. Go to WordPress's backend by navigating to Settings > General. There, switch the http in the "WordPress Address" and "Website Address" fields to https.
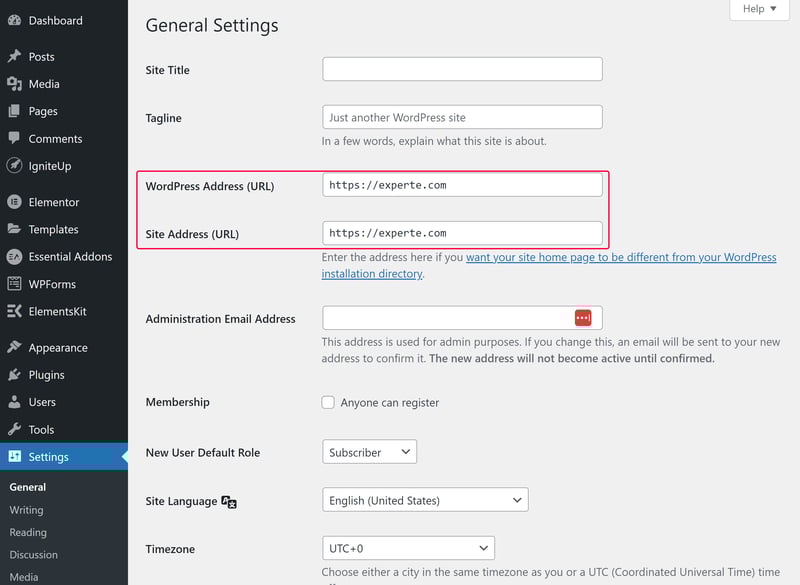
Next, you'll need to change your website's URLs in WordPress's dashboard.
Finally, do the same with your website's permalinks by going to Settings > Permalinks and adding https. Then, click on "Save changes" in the bottom left, to automatically update your permalinks.
Update Your WordPress Database
There's still a little bit left to do since some areas of your website or pages might continue to load with http rather than https. This happens when internal links, images, or plugins remain bound to the old URLs. You could manually look for and replace these, however, depending on the size of your site, this might be unrealistic or undesirable.
For a shortcut, why not use a plugin that was designed for this, such as Better Search Replace? As soon as you've installed the plugin, go to Tools > Better Search Replace. There, you'll just need to specify that you'd like to replace your old http URLs with the newer https ones:
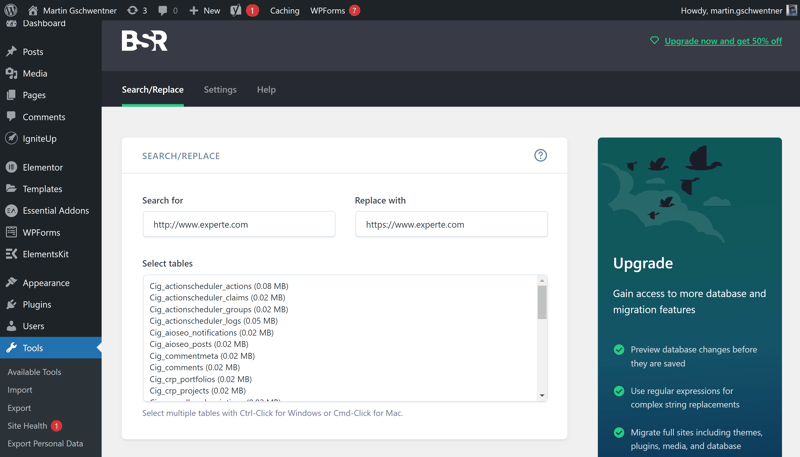
Better Search Replace helps to easily find old URLs in WordPress and swap them out with new ones.
Our tutorial shows how to install WordPress plugins:
Forward from HTTP to HTTPS
Even though you've switched your website to https, you'll still want it to be reachable through its old http address. Most hosting providers offer options in the admin dashboard for enforcing SSL use:
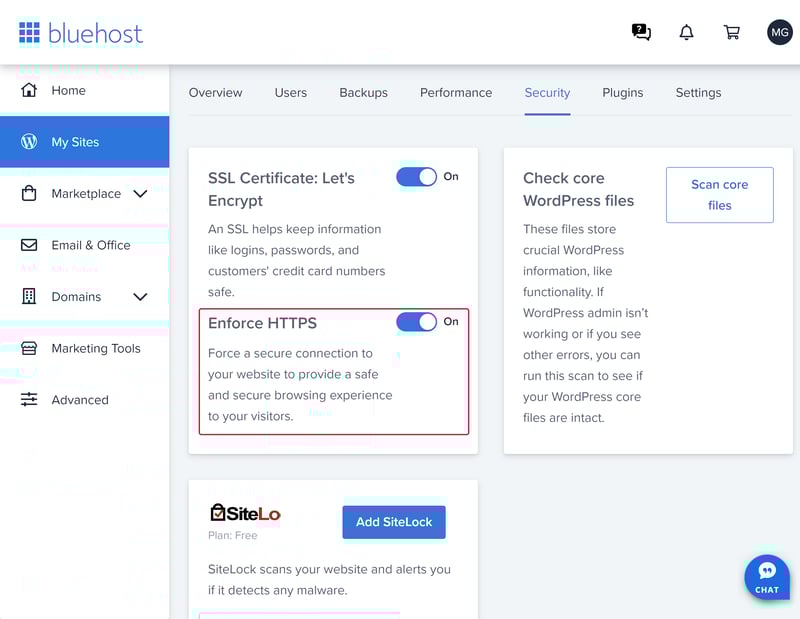
Most hosting providers allow site admins to make their site exclusively available via SSL.
Alternatively, you can add a redirect notice to your website's .htaccess file. You'll find this in your WordPress root directory.
The .htaccess file can either be edited directly on the server or copied to your system using an FTP program and worked on there. To edit, all you'll need is a simple text editor like Notepad. Just open the file, and add the following code:
Adjust the URL in Google Search Console
We mentioned search engine optimization at the beginning of this article. Make sure to let Google know that you've made the switch to SSL in Google Search Console. This doesn't happen automatically, since Google will otherwise continue to view your website's http and https versions as two separate websites.
Go to Google Search Console and add a new entry with your https URL by clicking on "Property". In case there's already an entry with the old http version of your website, you won't need to do anything, as Google will automatically recognize the change.
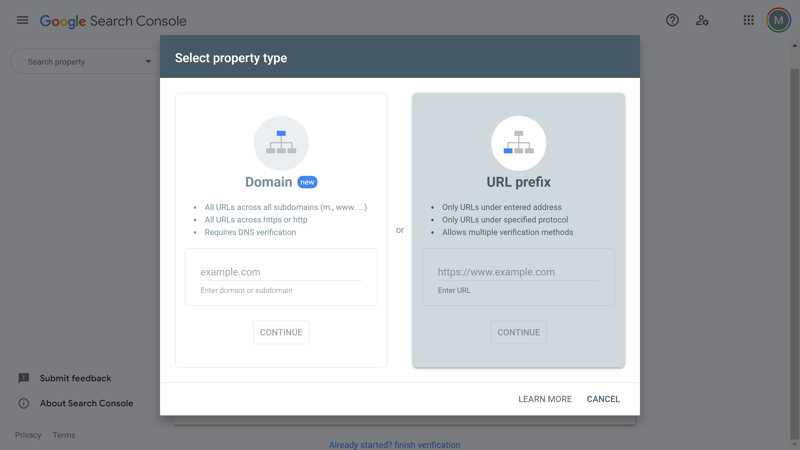
You'll need to add a new entry for your https URL in Google Search Console.
Congratulations, you've successfully updated your WordPress website to use SSL. Its old URL might still be used by some services and third parties, on social media, in an email signature, with Google Analytics, or in backlinks. For that reason, it's a good idea to systematically check all of your digital resources and update your website's URL.
Conclusion: SSL Isn't Optional
These days, a WordPress website without SSL encryption isn't good enough. Not only is it relatively unsafe, but it also scares away visitors and customers, and is frowned upon by search engines. Even your website's performance will unnecessarily suffer if you don't use SSL.
For that reason, don't procrastinate about making the changeover. As we've shown above, all it takes is a few, fairly easy steps, and thanks to free services like Let's Encrypt, it probably won't cost you a cent.
Do you have more questions about WordPress? In our EXPERTE.com WordPress guide, we've put together a selection of comprehensive guides and tutorials, for both beginners and more advanced users.