How to Create a WordPress Ecommerce Store: 7 Steps to Your Own WordPress Online Shop


Starting your own online store doesn't have to be complicated or expensive. With WordPress and WooCommerce, you can build your shop without any coding skills and keep full control over features, costs, and content. But how does it work in practice?
This guide walks you through every step of building your WordPress ecommerce store. You’ll learn how to handle the technical setup, manage products, set up payment methods and shipping, and meet key legal requirements.


The WooCommerce plugin turns your WordPress website into a fully functional online store. You manage your products, payment methods, and shipping options directly from the WordPress backend.
Installation and setup require no coding skills. You can also customize your store’s design and layout without writing a single line of code.
Both WordPress and WooCommerce are free to use. The only costs come from the technical infrastructure, such as web hosting and a domain.
Unlike hosted ecommerce website builders like Shopify or Wix, WooCommerce gives you full control over your content and data.
Why WordPress & WooCommerce Are a Powerful Combo
WordPress is the world’s most popular platform for building websites. With the WordPress plugin WooCommerce, the official ecommerce extension by WordPress developer Automattic, you can add a full online store to your WordPress site.
This combination is especially popular with freelancers, small businesses, and creatives. Compared to hosted ecommerce website builders like Shopify and similar platforms, it offers several key advantages:
No license fees, full control
WordPress and WooCommerce are free. You don’t pay recurring fees and can customize the store however you like. All content, products, and customer data are yours.Easy to manage from the WordPress backend
The plugin integrates directly into the familiar WordPress dashboard. You manage products, orders, and settings in one place. A setup wizard walks you through the configuration.Comprehensive store features
A product catalog, shopping cart, checkout, customer accounts, email notifications, sales tax, and coupon codes are all built into WooCommerce. Need more? Just add plugins as needed.Custom store design options
WooCommerce offers a wide range of templates (themes). You can edit colors, fonts, logos, and layouts visually using the built-in Customizer, or go fully custom with code.Huge selection of extensions
WooCommerce is one of the most widely used ecommerce systems in the world. This means a massive library of extensions. Many are free, while some premium ones come at a cost.
That said, this combination isn't all upside. Unlike all-in-one store solutions that handle many tasks for you, here you're responsible for the technical side and day-to-day operations:
More effort for maintenance and security
A WooCommerce store is entirely your responsibility. You handle updates, backups, security measures, and performance yourself. Compared to hosted solutions like Shopify or Wix, the technical effort is significantly higher.Legal compliance is on you
WooCommerce doesn’t include built-in legal safeguards. You need to add and maintain all privacy mechanisms and legal texts yourself.Extensions cost extra
While many features are covered by free plugins, advanced needs like automated invoicing or inventory management integrations require paid extensions.
Tutorial: How to Build a WordPress Ecommerce Store With WooCommerce
Setting up a WooCommerce store can be broken down into 2 main phases:
- 1.
First, you need to take care of the technical foundation: set up WordPress and install WooCommerce.
- 2.
Then comes the actual store setup: adding products, configuring shipping and payment methods, handling security and privacy, and optimizing your store for marketing and sales.
Let’s go through each step one by one:
Install WordPress
The exact setup process depends on your hosting provider, but it looks very similar across most services. For this guide, we’ll install WordPress using Hostinger’s 1-click installer.

Step 1: Log in to your Hostinger account. Open your website overview and start the setup by clicking "Add Website." Then select WordPress as your platform.
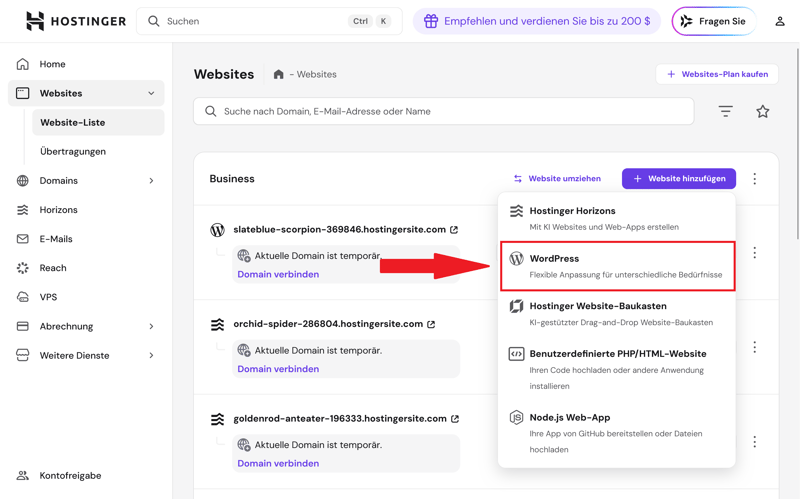
Select WordPress.
Step 2: Create your WordPress admin account. You’ll use these credentials to access your website’s backend later.
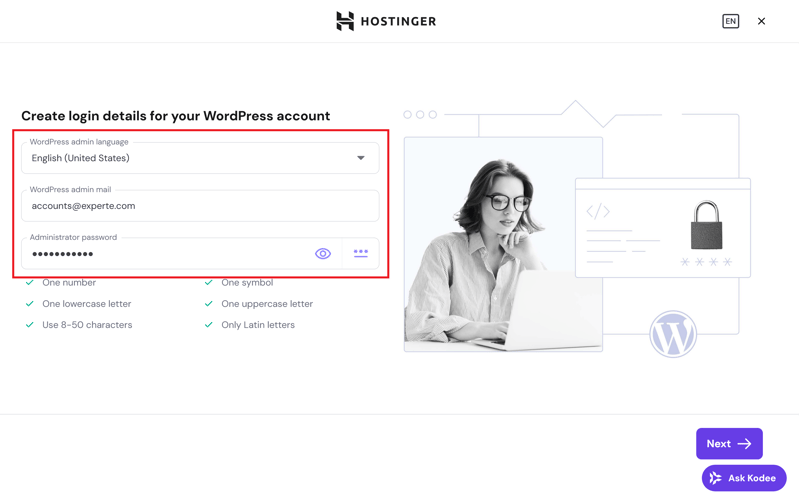
Login credentials for your WordPress account.
Step 3: Choose how Hostinger should set up your website. You have three options:
- 1.
Automatic creation using AI
- 2.
Selection of a pre-designed layout
- 3.
Blank WordPress installation
If you go with the AI option, the system automatically generates a page structure with sample content. If you choose a design template instead, you get a ready-made layout that you can customize later. The third option starts WordPress without an additional theme.
You can find our WordPress theme recommendations here:

In our example, we chose a pre-built website template and skipped the AI option:
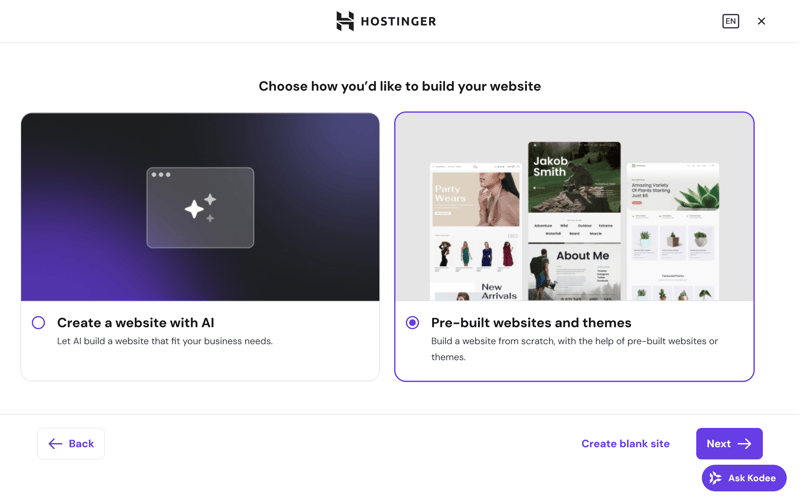
Hostinger gives you several options to choose from.
Step 4: Now pick a specific design template. This determines the visual foundation of your website, including the layout, color scheme, and typography. Hostinger also offers templates designed specifically for online stores:
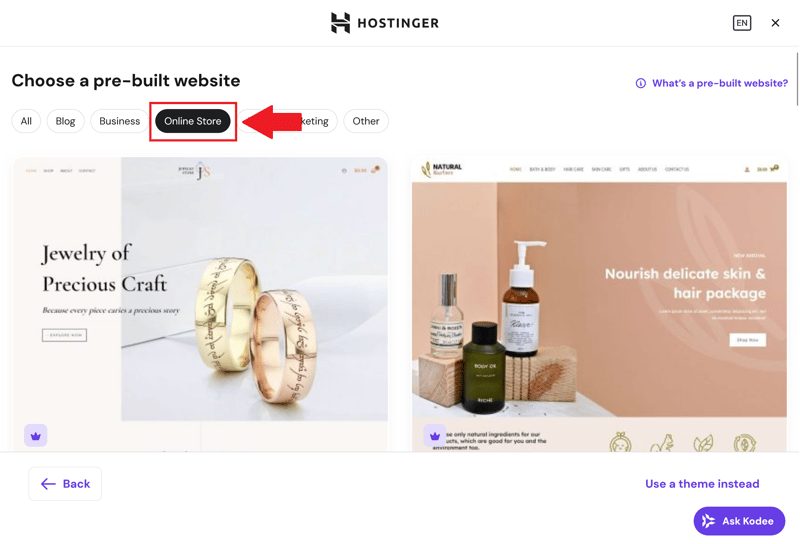
Hostinger also provides store-specific templates.
Step 5: Next, decide whether you want to install additional plugins right away. WooCommerce isn't available as an option here, so you'll need to add the plugin manually later.
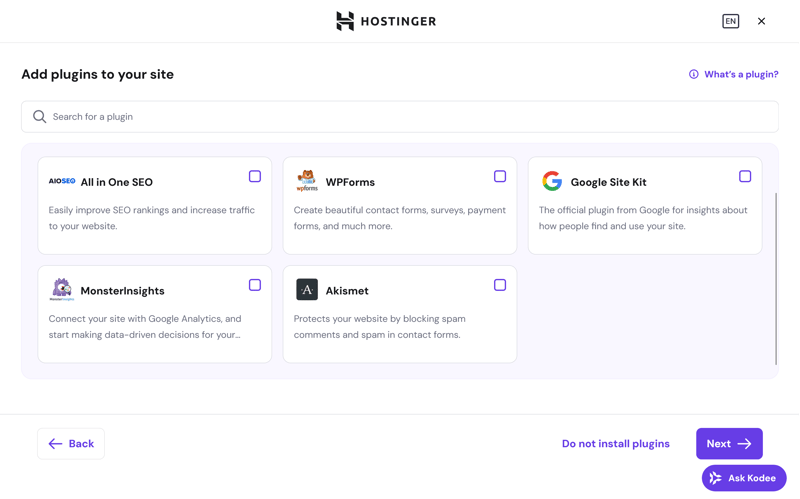
These plugins can be installed directly through Hostinger.
Step 6: In the next section, set up your website’s URL. You can register a new domain or use an existing domain. You can also use a temporary address provided by Hostinger.
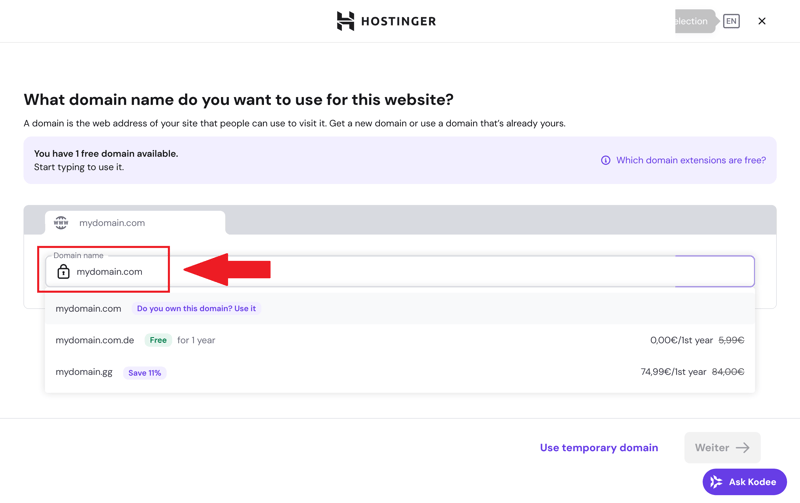
Enter your domain.
Step 7: WordPress now installs automatically and is usually ready within a few minutes. Once the process is complete, you’ll have access to the WordPress dashboard:
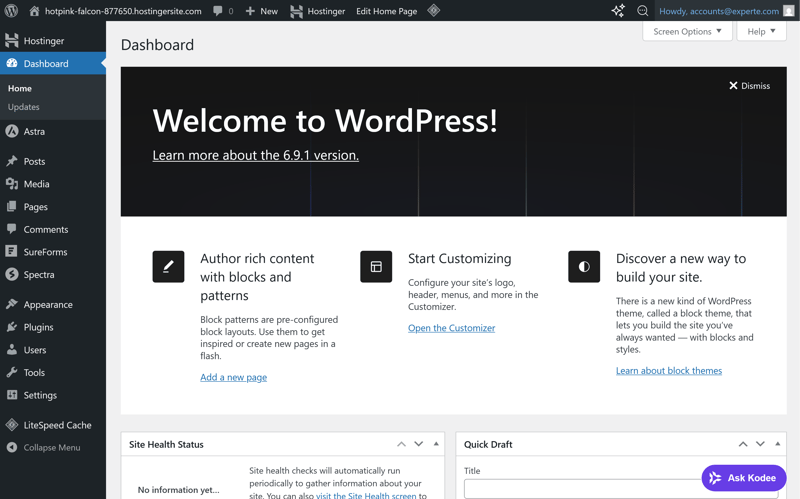
The WordPress dashboard.
Your WordPress installation is now complete. In the next step, you’ll set up your store using WooCommerce.
Set Up WooCommerce
Your WordPress site is up and running, but it doesn’t have any ecommerce features yet. To turn it into an online store, the next step is to install and set up the WooCommerce plugin.
Step 1: Install the WooCommerce Plugin
In your WordPress dashboard, go to "Plugins" and click "Add New". Search for WooCommerce and select the official plugin by Automattic from the results. Then install and activate it.
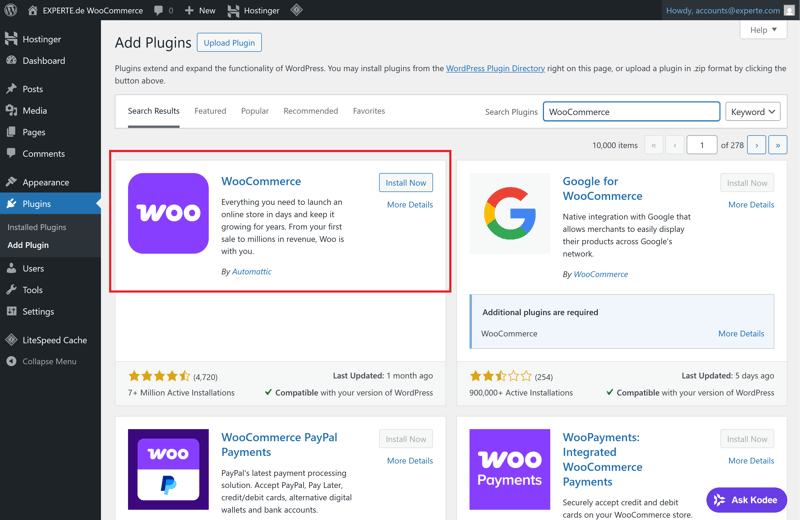
Install the WooCommerce plugin.
Right after activation, a setup wizard will launch. It walks you through the most important settings and asks for several store details, including:
Your business address (location)
The currency you want to sell in
The product types you plan to sell (physical products, digital goods, services)
Your business’s sales tax obligations
You can change these settings later, but it's best to enter them correctly from the start. This saves time and prevents issues with shipping, payment methods, and tax calculations down the road.
Step 2: Choose the Right Store Theme
Your theme controls how your online store looks and how visitors navigate it. It determines how products are displayed and how your layout, buttons, and navigation are structured.
Important: Don’t just pick a theme that looks impressive. It needs to be compatible with WooCommerce and properly support store features like the cart and checkout pages.
In the WordPress menu, go to "Appearance" and click "Themes," then "Add New." In the search bar, type something like "Storefront" or "Astra." Both are reliable, free themes that work great with WooCommerce.
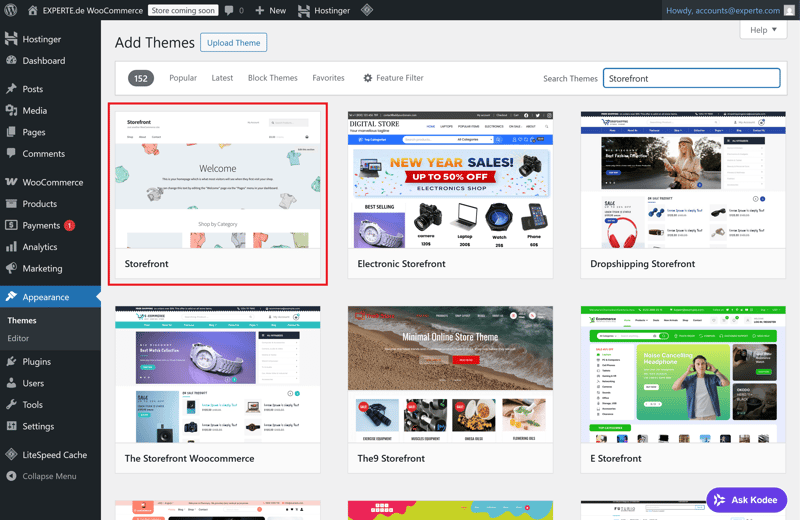
The free Storefront theme for WooCommerce.
Activate the theme you've chosen. Then use the built-in Customizer to adjust the basic design elements to your liking:
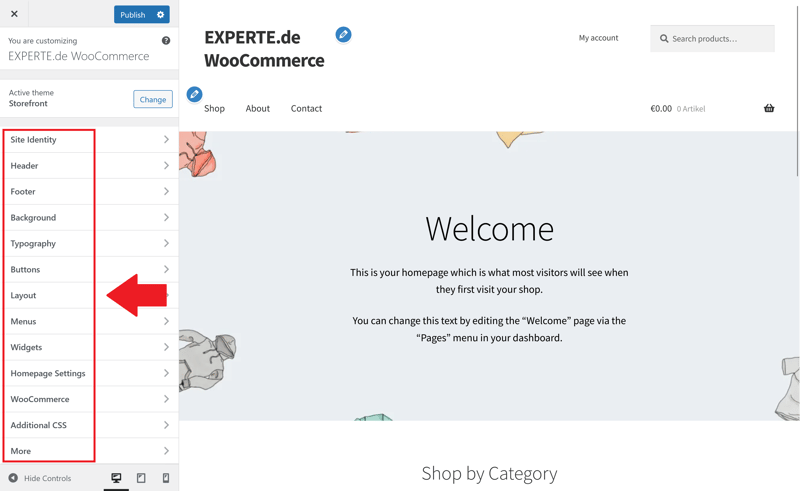
Use the Customizer to adjust the look and feel.
Common adjustments include:
Colors for buttons, links, and backgrounds
Fonts for body text, headings, and navigation
Logo and favicon
Layout of the homepage, product overview, and sidebar
Position and content of the header and footer
Some themes offer additional store-specific settings, such as product grids, quick-view options, or wishlists. Take advantage of these to make your store even more functional.
At the bottom of the Customizer, you’ll find a preview toggle that lets you switch between desktop, tablet, and smartphone views. Use it to check whether colors, spacing, font sizes, and navigation all work properly on mobile devices.
Step 3: Configure Basic Store Settings
With your design in place, it's time to set up the core features of your store. WooCommerce has a central settings page with several sections. Go through all of them before launching your store.
Don’t let the number of settings overwhelm you. Just work through them step by step and take your time filling everything out.
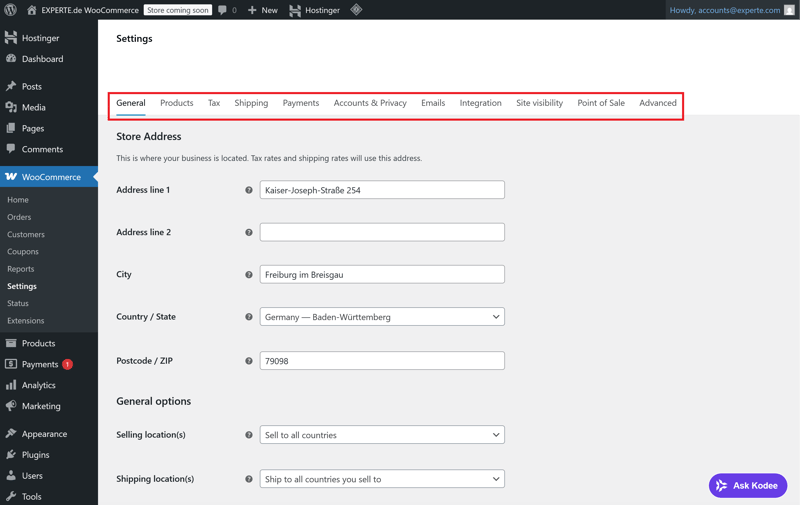
WooCommerce offers a wide range of store settings.
The most important sections to start with are "Products," "Tax," and "Emails."
Products
This is where you define basic settings for your store. That includes units of measurement such as kilograms or centimeters, how your product pages are structured, and how reviews and stock levels are displayed.Tax
This section lets you set up tax calculations. You can enter tax rates, choose whether prices are shown with or without tax, and control how taxes are calculated in the cart and at checkout.Email
Here you manage all of your store's automated notifications. That includes order confirmations, status updates, and internal alerts. Make sure to check the sender address, content, and design of each email.
These settings affect nearly every part of your store. They influence pricing, checkout, invoices, and legal information. Make sure you don’t leave any important fields blank.
Step 4: Create Required Pages
WooCommerce automatically creates a few key pages: Shop, Cart, Checkout, and My Account. Depending on where your business is located, you may also need certain legally required pages to stay compliant. In Germany, for example, these include:
Imprint (Impressum)
This page lists all legally required information about your business: name, full address, contact details, authorized representatives, and (if applicable) your commercial register entry and VAT ID. You also need to include details about your regulatory authority or professional association, if relevant.Privacy Policy
This page explains what data your store collects, how it is processed and stored, and whether third parties such as payment providers are involved. You also need to mention any tracking services such as Google Analytics.Cancellation Policy
This page informs customers how and within what time frame they can cancel a purchase. Special rules apply to digital products, such as waiving the right to cancel once a download begins.Terms and Conditions
Your terms and conditions cover all the legal details of a purchase: payment terms, delivery times, retention of title, and warranty periods. Return and refund policies should be clearly outlined here as well.
In the WooCommerce settings, you assign these required pages to the appropriate sections. The system then automatically links to your terms and conditions at checkout and displays the cancellation policy where it belongs.
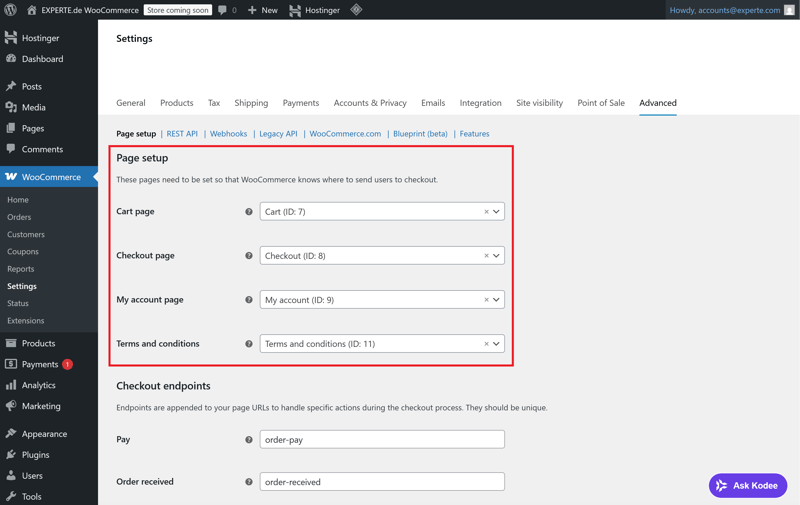
The required pages are properly linked.
At this point, WooCommerce itself is fully set up. You’ve installed the plugin, chosen a suitable theme, configured the core settings, and created all legally required pages. Your online store is now ready for products, payment methods, and shipping rules.
Adding Products
Next, it’s time to build your product catalog. WooCommerce makes it easy to create and manage products with individual prices, descriptions, images, and variants. It supports both physical goods and digital products.
Step 1: Create Your First Product
To add a product, go to "Products" in the WordPress main menu and click "Add New Product."
Start by entering the product title. Right below it, you’ll find a field for a longer product description. Use this space for technical details, usage tips, or key selling points.
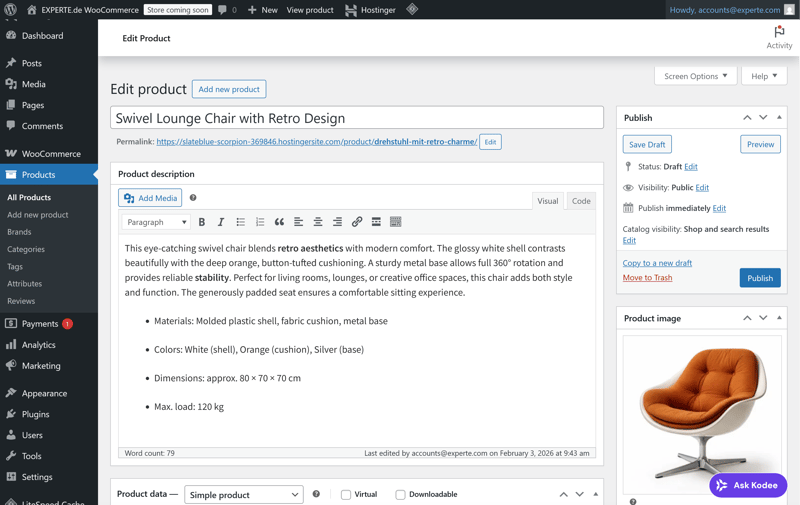
Creating a new product in WooCommerce.
On the right side, assign the product to a category. You can create main categories and subcategories, like "Furniture" and "Furniture > Tables."
Add relevant tags to connect products by topic. This helps customers filter and find what they’re looking for.
You can choose from several product types. In the Product Data section, select “Simple product” if your item comes in only one version. Grouped and variable products are also available, and you can set them up as physical, virtual, or downloadable products.
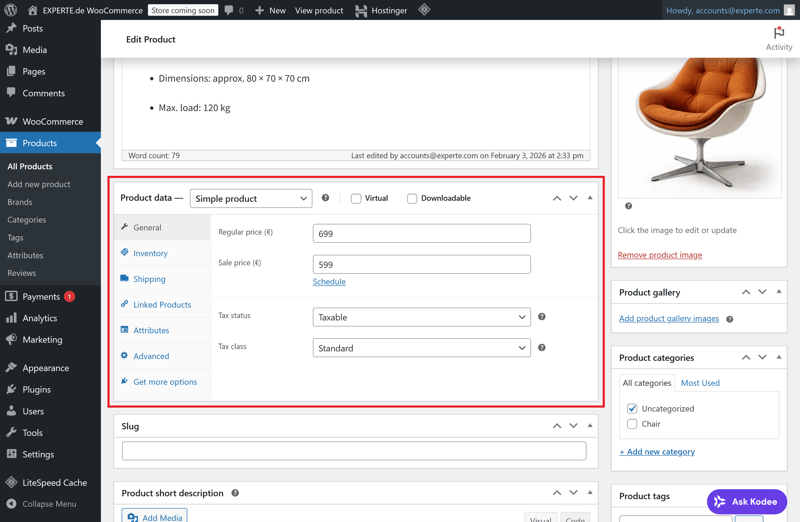
Product data in WooCommerce.
Product data is split into several tabs. For a simple product, you’ll see the following sections:
General: Set the regular price and an optional sale price.
Inventory: Enable stock management, enter the available quantity, and choose whether to block purchases when the item is out of stock.
Shipping: Enter the weight and dimensions. These values can be used to calculate shipping costs.
Linked Products: Choose upsell or cross-sell items to display on the product page.
Attributes: Add custom attributes as needed. You can choose to keep them hidden so they do not appear on the product page.
Advanced: Manage purchase notes or enable customer reviews, among other options.
Once all required fields are filled in, save the product. It will automatically appear in your store as long as visibility is set to “Public”.
Step 2: Add Product Images and Galleries
Strong product images are key to driving sales. Scroll down to the “Product image” section in the editor and click “Set product image.” Upload a new image or choose one from your media library.
Use high-resolution product images with clear details and a neutral background. Keep image dimensions consistent across all products for a clean, professional layout.
You can also create a gallery with additional images. These appear below the main image on the product page. Use the gallery for close-ups, different angles, or usage examples.
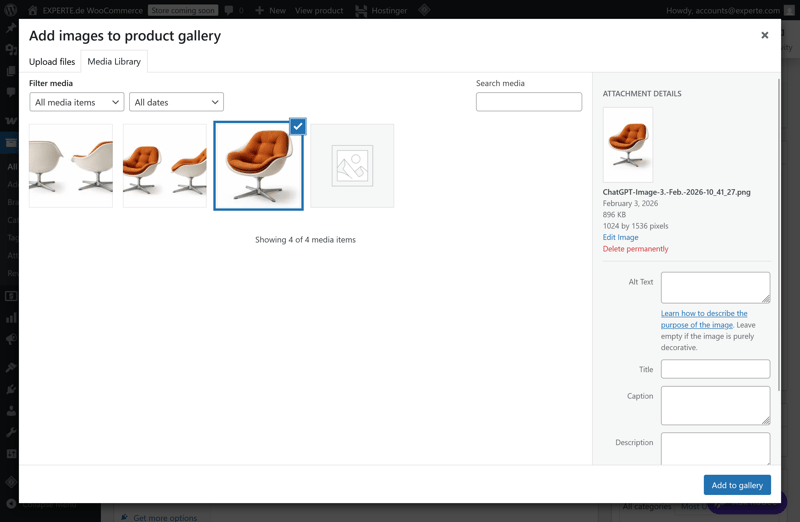
Multiple product images in a gallery.
Step 3: Create Product Variations
Many products come in different versions, like various sizes, colors, or materials. For these, you’ll want to create a variable product. Select “Variable product” from the product type dropdown.
Next, go to the “Attributes” tab. Create attributes such as size or color and enter the available options. Make sure to check the box that allows these attributes to be used for variations.
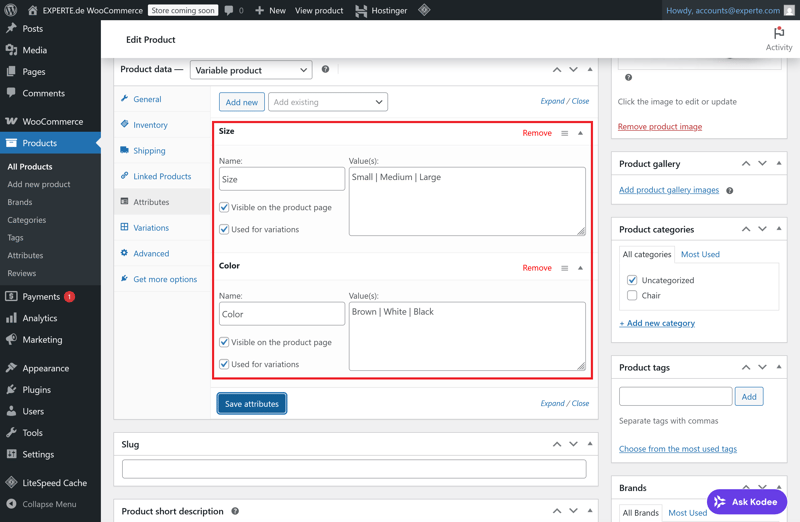
Two attributes of a variable product.
Then switch to the “Variations” tab and click “Create variations from all attributes.” WooCommerce will automatically generate all possible combinations, such as “Brown / Medium” or “White / Large”. You can also add combinations manually.
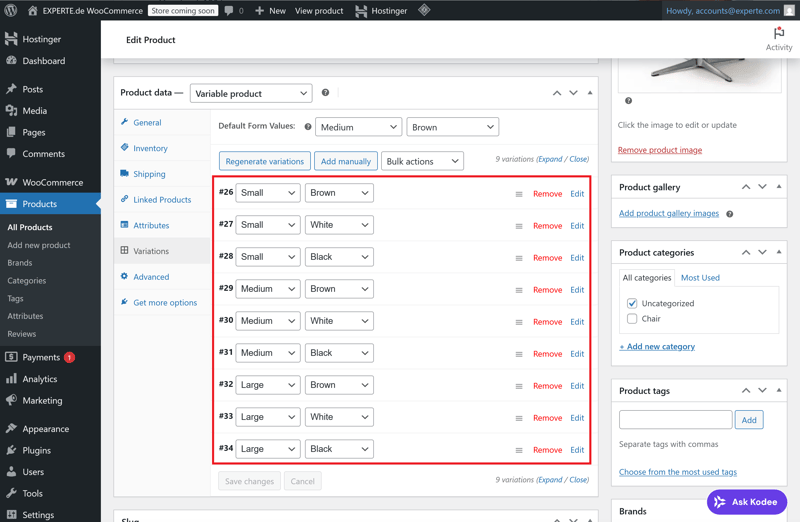
WooCommerce automatically generates variations from attributes.
For each variation, you can set individual prices, stock levels, SKUs, and images. This gives you precise control, even for complex product setups.
How to Create Digital Products
WooCommerce also supports digital products like ebooks, audio files, or software. To set one up, check the “Downloadable” option in the product type settings.
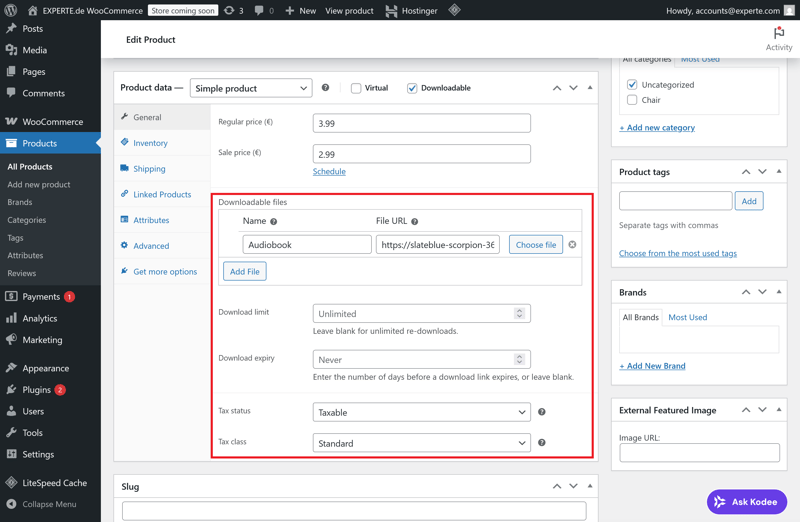
A digital, downloadable product.
Next, either enter a download URL or upload the file directly to your WordPress media library. You can also set the maximum number of downloads and the expiration period for the download link in days.
WooCommerce generates a unique download link for each customer.
Heads up: Digital products may be subject to special tax and invoicing rules. Make sure to check whether your content is taxed at the standard or reduced rate, and whether the customer’s country affects tax calculation.
For example, if you sell an ebook to an individual in France, you’ll need to charge French VAT.
Payment Methods and Shipping
Two things are essential for running your store day to day: setting up payment methods so customers can pay for your products, and configuring shipping options so orders reach them.
Step 1: Set Up a Payment Provider
WooCommerce comes with a few basic payment options out of the box, such as bank transfer, cash on delivery, check, or cash on pickup.
If you want to accept online payments, you’ll need to integrate a payment provider such as PayPal or Stripe. These handle payment processing and support various methods such as credit cards, direct debit, or PayPal.
To add PayPal to your store, go to the Payments section in the WooCommerce menu, search for PayPal, and click “Install”.
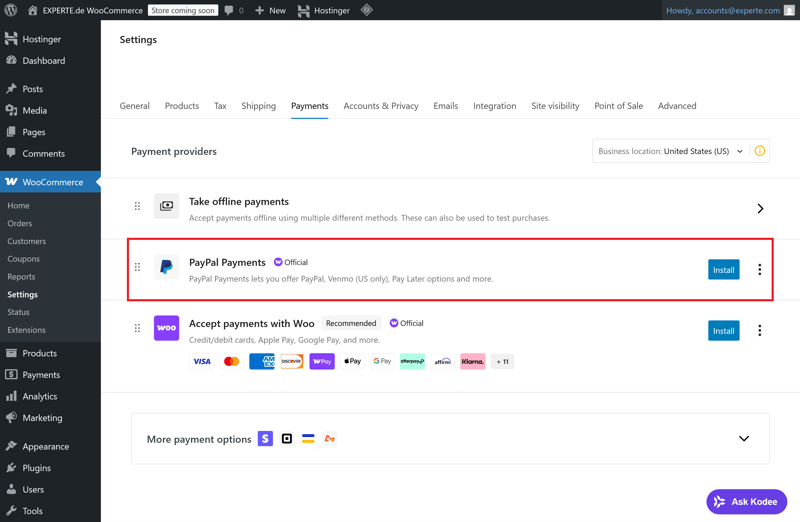
PayPal is available as an extension in WooCommerce.
WooCommerce uses the official PayPal payment gateway. Once you enter your PayPal credentials, it connects your store to your PayPal account.
The integration supports:
Payments via PayPal balance, direct debit, or credit card
Automatic payment confirmation within the WooCommerce system
Refunds directly from the WordPress dashboard
In the advanced settings, you can choose whether customers need a PayPal account during checkout or can pay by credit card without creating an account.
The US-based payment platform Stripe is another option for accepting credit cards, Apple Pay, and Google Pay in WooCommerce. Install and activate the official WooCommerce Stripe plugin through the payment settings:
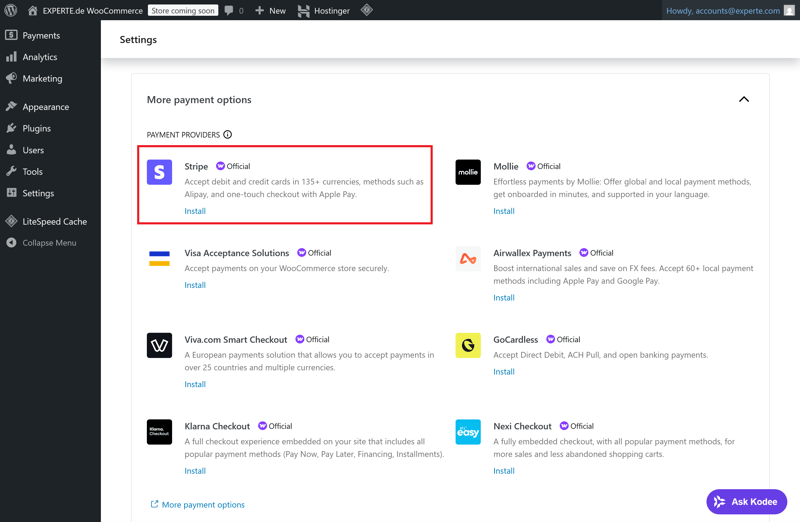
Stripe as an additional payment provider for your online store.
Once connected, you’ll have access to the following options:
Credit card payments (Visa, Mastercard, American Express, etc.)
Payments via Apple Pay and Google Pay
Optional: local payment methods like SEPA
Stripe encrypts all transactions and confirms them in real time. You can also process refunds directly from the WooCommerce backend.
Don’t forget: payment services like PayPal and Stripe charge a fee for every transaction. These fees typically include a fixed amount plus a percentage of the sale.
The exact costs depend on the provider and the origin country of the payment. Make sure to review the fee structures in advance and factor them into your pricing.
Beyond the payment options available through PayPal and Stripe, WooCommerce also supports several other methods you can enable depending on your audience, business model, and location:
Bank transfer: Customers receive your bank details after placing an order. The item ships once payment is received.
Cash on delivery: Payment is collected at the time of delivery. This option is rarely used today and comes with extra fees.
Pay in store: Ideal for local businesses with a physical counter or click-and-collect services.
Invoice: Only partially suitable, since WooCommerce doesn’t include built-in credit checks. If you want to offer invoicing, consider using a service like Klarna.
It’s a good idea to offer multiple payment methods. Just make sure the checkout stays clean and easy to follow. In the WooCommerce settings, you can control the order and visibility of each payment method yourself.
Step 2: Set Up Shipping
WooCommerce offers flexible options for defining shipping zones, shipping methods, and shipping costs. You decide where you ship, which options are available, and how shipping costs are calculated. With additional plugins, you can also add features like label printing and shipment tracking.
In the WooCommerce menu, go to “Shipping.” Click on “Add shipping zone.” A shipping zone defines a geographic area (e.g., the United States, Canada, or Europe) that you assign specific shipping methods to.
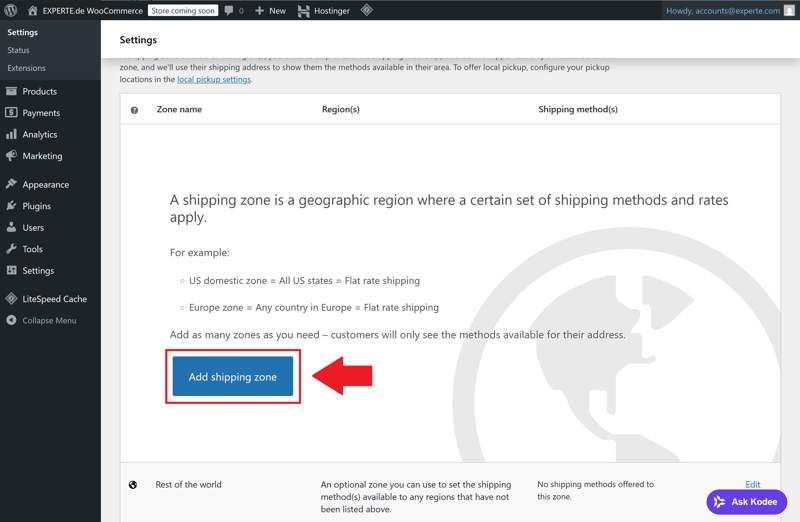
Adding a shipping zone to your online store.
Give the zone a name, select the destination country or region, and then click “Add shipping method.” WooCommerce provides the following default options for each zone:
Flat rate: A fixed amount, regardless of cart value or weight
Free shipping: Can be tied to conditions, such as a minimum order amount
Local pickup: Only useful for in-store pickup or local sales
You can create multiple shipping zones, for example for the United States, North America, and worldwide. Each zone gets its own set of shipping rules that you define.
Shipping cost calculation is based on the shipping method you choose. For flat rates, you enter the fixed amount directly in the settings. Alternatively, you can use plugins to calculate shipping costs dynamically based on weight, item count, or cart value.
For more complex setups, a tiered model works well. Here’s an example:
Weight (lbs) | Shipping cost |
|---|---|
up to 2 lbs | $3.90 |
over 2 lbs up to 11 lbs | $5.90 |
over 11 lbs up to 22 lbs | $7.90 |
over 22 lbs up to 44 lbs | $9.90 |
over 44 lbs | $14.90 |
You can set up tiered pricing like this with an extension like Table Rate Shipping. It lets you create multiple rules per zone and shipping method. You can even combine conditions based on cart value and weight.
Shipping classes are especially useful when you sell products with very different shipping costs. They let you group items by shipping requirements, such as bulky goods, letter mail, or express products.
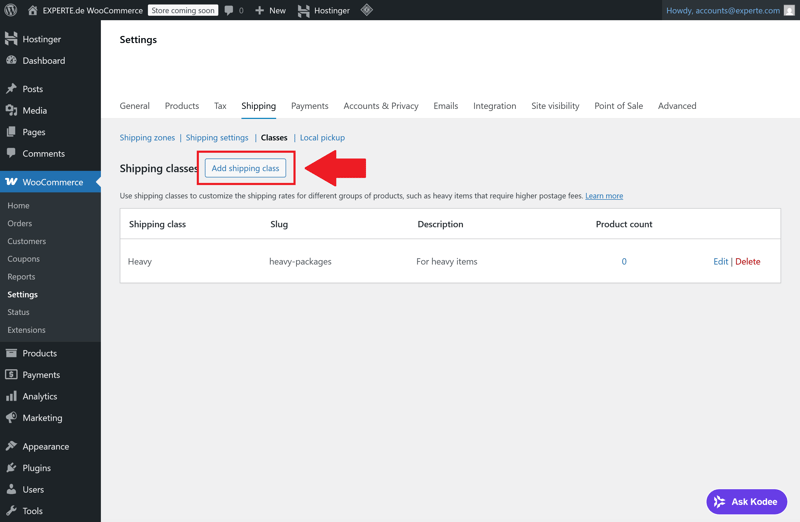
Adding a shipping class.
Here’s how to create a shipping class:
- 1.
In WooCommerce, go to Settings > Shipping > Classes
- 2.
Click “Add shipping class”
- 3.
Enter a name and an optional description
- 4.
Save the class and assign it to the relevant products
Within each shipping zone, you can set a specific shipping price for each class. WooCommerce automatically calculates the right combination when a customer has items from different classes in their cart.
For professional shipping, you’ll want to connect your store with carriers like DHL or UPS. Many of them offer official plugins that let you do the following directly from the WooCommerce dashboard:
Print shipping labels
Generate tracking numbers
Send tracking info to customers
These integrations typically work via an API connection and a separate business account with the carrier. Once everything is set up, you can create labels for new orders in just a few clicks and track the status of every shipment.
Security and Privacy
Your WooCommerce store handles sensitive data, so keeping your system secure is critical. At the same time, you need to comply with regulations like the GDPR in Europe to ensure your store is not only safe, but also legally compliant.
Security Best Practices for WordPress
The most important foundation for security is keeping your WordPress installation up to date. Update WordPress itself, along with all plugins and themes, as soon as updates are available. On top of that, enable extra security features that reduce common attack surfaces.
Here are the key steps to take:
Set up automatic backups
Use a plugin like UpdraftPlus or BackWPup to create daily backups of your site. Store them externally (e.g., in the cloud) so you can restore your site quickly if something goes wrong.Set up a firewall and login protection
Plugins like Wordfence Security or Solid Security block suspicious access attempts, limit login attempts, and protect against known attack patterns.Enable two-factor authentication
Turn on two-factor authentication for your WordPress login to add an extra layer of security. This requires a one-time code from an app like Google Authenticator or Authy every time you sign in.Restrict WordPress user roles
Limit backend permissions to only what each user needs. Set clear roles, such as Administrator, Shop Manager, and Editor.
Making Your Online Store GDPR-Compliant
To run a privacy-compliant store in Europe, you need more than just legal text. You also need a clean technical setup. That starts with a proper cookie banner and includes consent management for tracking and analytics.
A basic GDPR setup für European shops should include at least the following:
Set up a cookie banner
Visitors must be able to actively choose whether to accept non-essential cookies. Tools like Borlabs Cookie or Real Cookie Banner reliably block scripts until consent is given.Always document consent
Good plugins record cookie and tracking consent and store it in a legally compliant way, including timestamps and user identifiers.Use double opt-in for newsletters
Use the double opt-in method for email signups and document every subscription.Only track after consent
Services like Google Analytics or Facebook Pixel require explicit user consent. Use your cookie tool to automatically control when these scripts load.
The fewer external tools you use, the easier it is to stay on top of legal compliance. Keep your privacy policy up to date and run regular checks, especially when you add new plugins or tracking tools.
Optimization and Marketing
To get customers to find your WooCommerce store and keep them coming back, you need two things: a solid SEO foundation and simple strategies for conversions and customer retention. A tracking system completes the setup by making your results measurable.
SEO Basics for Products and Pages
For your products to show up on Google, your store needs a search-engine-friendly structure. WordPress comes with basic SEO features, but you’ll need to fine-tune your settings to get the most out of your site.
These steps form the foundation for a WordPress ecommerce store that ranks well in search results:
- 1.
Clean permalinks
Go to the Permalinks section in your WordPress settings. Choose "Post name" or a similar option that includes your product name. Readable URLs like shop/product/elegant-black-chair look professional and are easier for search engines to crawl. - 2.
SEO titles and meta descriptions
Add a custom title and meta description to each product and category page. Keep them concise and include your most important keywords. - 3.
Well-structured content
Use subheadings (H2, H3), short paragraphs, and bullet points to make your content easier to scan and read. - 4.
Alt text for images
Add descriptive alt text to every product image. This improves your visibility in image search results and makes your store more accessible.
When you're just starting out, optimizing your product pages is enough. As your catalog grows, a well-structured store layout and clear categories become increasingly important. This helps search engines and, most importantly, your customers.
Conversion and Customer Retention
Traffic alone doesn’t generate revenue. What matters is that visitors convert and return. Many of these strategies can be set up directly in WooCommerce:
Newsletter integration
With plugins like Mailchimp for WooCommerce, you can add email marketing directly to your store. Customers can subscribe to your newsletter during checkout.Discount campaigns
Discount codes or limited-time offers are easy to create using WooCommerce coupons. Set up time-limited vouchers with a minimum order value and optional product restrictions.Upselling and cross-selling
Recommend related products from the same category or higher-value alternatives directly on your product pages. Bundle deals or accessory suggestions can also help increase the average cart value.
Tracking and Analytics
To improve your store, you need to understand what works and what doesn’t. Make it a habit to track key metrics like conversion rate, average order value, and bounce rate. That’s the only way to know which strategies are effective and where you need to make adjustments.
WooCommerce only provides basic analytics data. For deeper insights, you'll want an additional tool. Google Analytics is free and offers a wide range of reporting options. Connecting it to WordPress is quick and easy:

Google Analytics is just one of many options. Here's a quick comparison of popular analytics tools:
Tool | Hosting | Cookie required | GDPR compliant | Key features |
|---|---|---|---|---|
Matomo | Self-hosted | No (with cookieless configuration) | Yes | Full control, privacy-friendly, detailed reports |
Google Analytics | Google Cloud | Yes | Only with user consent | Market leader, but data-heavy and complex |
Plausible | EU hosting or self-hosted | No | Yes | Minimalist, no user tracking |
Fathom | EU or US hosting | No | Yes | Simple interface, quick setup |
Choose a tool that fits your business model and privacy strategy. The less personal data you collect, the easier it is to stay compliant with data protection regulations.
Final Check: Ready to Start Selling?
Your WordPress ecommerce store with WooCommerce is now set up. You've covered all the technical and legal basics, added products, configured payments and shipping, and handled privacy requirements. Now it's time for one final check, ideally from your customer's perspective.
Walk through the entire order process yourself, from landing on the homepage to selecting a product and completing an order. Test all payment methods and make sure confirmation emails are delivered. Use this checklist to guide you:
Everything checked off? Then your store is ready to go live on a solid, flexible platform that grows with your business over time.
Conclusion: Set It Up Right, Build for the Long Run
A WooCommerce store running on WordPress gives you a flexible, affordable way to build your own online shop without coding or web design skills. You have full control over your content, features, and data. The trade-off is that you're responsible for technical setup, maintenance, and legal compliance.
The setup always follows the same steps: first, install WordPress and add WooCommerce. Then design your store, create products, configure payment methods and shipping, and handle legal and privacy requirements.
If you're ready to take on that responsibility, you'll have a powerful system you can customize to your exact needs and scale as your business grows.