How to Create a WordPress Plugin: A Step-by-Step Guide

Building your own WordPress plugin from scratch might sound complicated at first. But it's easier than you might think: a basic understanding of PHP is enough to create your first features. Want to give it a try?
In this guide, we'll show you how to create a simple WordPress plugin step by step, complete with example code and practical tips for expanding it later.


Custom plugins let you add tailored features to WordPress. You stay independent from third-party developers and keep full control over your extensions and customizations.
The barrier to entry is lower than many people think: basic PHP knowledge is enough to build simple features.
To get started, all you need is a single PHP file. From there, you can build out your plugin step by step.
With clean code, a clear structure, and a few basic security practices, you can avoid conflicts and reduce maintee headaches..
Why Build Your Own WordPress Plugin?
Building your own plugin makes sense whenever you want to extend WordPress in a specific way. Sure, there are countless ready-made extensions available. But many of them are bloated or not flexible enough for your specific needs — not to mention the potential costs.
With a self-built plugin, you stay in control, avoid unnecessary dependencies, and can tailor features exactly to your needs.
This freedom and independence come with several benefits — but also a few limitations you should be aware of:
Targeted features without the bloat
A custom plugin contains only what you actually need. You avoid unnecessary overhead from third-party features that slow down your site or introduce potential security risks.Independent from your theme
Plugin code stays intact even when you switch themes. While functions in your theme’s functions.php file disappear with the theme, your custom plugin remains available.Survives updates
WordPress updates won't overwrite your plugins as long as you don't modify the core. Your features remain intact through system updates.Easy to reuse
You can easily use your plugin on other WordPress sites. The code remains portable and version controlled, so you can deploy it across different projects.Better understanding of WordPress architecture
Building your own plugin helps you learn how WordPress works under the hood. You'll get hands-on experience with hooks, filters, and API functions.
You're responsible for maintenance and security
It's up to you to avoid security vulnerabilities, ensure compatibility with new WordPress versions, and resolve issues when needed.More effort than a simple snippet
A plugin requires more structure than a quick code snippet in your theme's functions.php. The initial setup takes more time.
How to Create a WordPress Plugin
Creating a simple WordPress plugin is quick and straightforward. We'll walk you through it step by step: setting up a development environment, creating your plugin folder, writing your first function, and testing your plugin in the WordPress dashboard.
Set Up Your Development Environment
Before you start coding, you should prepare your workspace. A local environment on your computer is the best option. This lets you test features without risking a live website.
At minimum, you'll need a local WordPress installation and a suitable code editor.
Create a Local WordPress Installation
These free tools work great for running WordPress locally:
Local by Flywheel is beginner-friendly and optimized for WordPress.
After installing one of these tools, set up a fresh WordPress instance. Inside this test environment, you'll find all the relevant directories — most importantly the wp-content/plugins folder, where your plugins are stored.
For more on installing WordPress, check out our guide:

Setting Up Your Code Editor
A modern code editor makes development much easier. Here are our top recommendations:
Visual Studio Code is a free, powerful editor with useful extensions like PHP Intelephense, WordPress Snippets, and WordPress Toolbox.
Sublime Text is a lightweight, fast editor with solid PHP support and helpful packages for syntax highlighting and code structure.
Both editors are great for getting started with plugin development. What matters most is that you feel comfortable and can work quickly in whichever one you choose.
Enabling Debugging
After installing your editor, open the wp-config.php file in your WordPress test environment and add the following:
This tells WordPress to log all PHP errors, warnings, and notices. You'll catch syntax and runtime errors faster and can fix them immediately.
These debug settings are only meant for your local development environment, not for live websites. Always disable debugging on production sites and analyze errors through server-level logging or monitoring tools instead.
Creating the Plugin Folder and Main File
Once your environment is ready, it's time to start building your plugin. First, you'll set up the basic folder and file structure:
Step 1: Navigate to the wp-content/plugins directory.
Step 2: Create a new folder, for example, my-plugin.
Step 3: Inside that folder, create a file named my-plugin.php and open it.
Next, you'll define the required plugin metadata in what is known as the plugin header.
Writing the Plugin Header
For WordPress to recognize your plugin, the main file my-plugin.php needs a header comment. This contains key metadata like the name, description, version, and author:
At minimum, the "Plugin Name" field is required. Without it, WordPress won't recognize your plugin or list it in the dashboard.
You can also add optional fields. This is especially useful if you plan to publish or localize your plugin later. Here's an example of a complete plugin header with all common fields according to the WordPress Plugin Developer Handbook:
Field name | Description |
|---|---|
Plugin Name | Displayed as the plugin's name in the backend |
Plugin URI | Link to the project or plugin website |
Description | Short description shown in the plugin section of the backend |
Version | Version number of the plugin |
Requires at least | Minimum required WordPress version |
Tested up to | Highest WordPress version the plugin has been tested with |
Requires PHP | Minimum required PHP version |
Author | Name of the developer |
Author URI | Website or profile page of the author |
License | License type, e.g., GPLv2 |
License URI | Link to the full license text |
Text Domain | Identifier for translating the plugin using gettext |
Domain Path | Location of language files within the plugin |
Save the file my-plugin.php with the header comment. In the next step, you'll start working on the plugin itself.
Write Your First Function
After the setup, it's time for the core of your first plugin: a custom function. A simple message in the WordPress dashboard is a great starting point. It confirms that the plugin loaded correctly.
The code consists of three parts:
- 1.
function defines a new function, in this case my_plugin_admin_notice.
- 2.
echo outputs HTML. The notice class creates a notification box in the WordPress dashboard.
- 3.
add_action attaches your function to the hook of the same name.
Always use a unique prefix for all function names. This prevents conflicts with other plugins or themes. Also remember to close your PHP file properly with ?>.
In Visual Studio Code, the file my-plugin.php looks like this. It contains a header comment and a custom function:
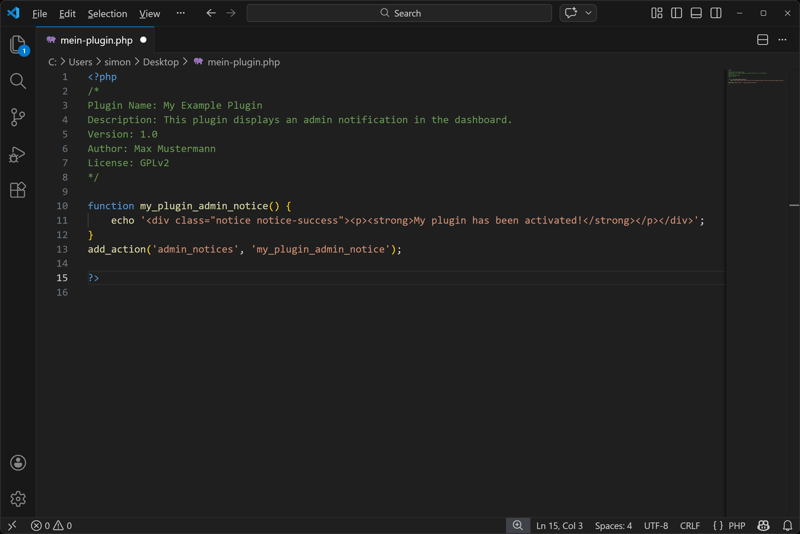
The file my-plugin.php in Visual Studio Code.
The basic structure is now in place. In the next step, you'll activate the plugin in the WordPress backend, check the result in the dashboard, and troubleshoot any issues if the output doesn't appear as expected.
Activate and Test the Plugin
Once you've saved the plugin file with the header and your first function, you can activate and test the plugin. This ensures your function runs as expected and no errors occur.
Step 1: Open the plugin section in the WordPress dashboard of your test environment.
Step 2: Find and activate your plugin (My Example Plugin).
If you've done everything correctly, WordPress will execute your function immediately after activation. A message saying "My plugin has been activated!" will appear.

The plugin has been activated successfully.
To make sure the plugin is working correctly, check the following points:
Troubleshooting: When Nothing Happens
If nothing appears or WordPress doesn't recognize your plugin, there may be several reasons. Here are some of the most common issues:
Possible cause | Solution |
|---|---|
Plugin not activated | Click "Activate" in the plugin list |
Header not correct | Make sure there's a value for "Plugin Name:" in the header comment block |
PHP syntax error | Fix the error in your editor (see code example above) |
Hook misspelled | It must be admin_notices, not admin_notice |
Function name mismatch | The function name and add_action entry must match exactly |
Expand Your Plugin and Build a Solid Structure
WordPress provides simple, modular ways to expand your plugin step by step. With just a few extra lines of code, you can add features that bring real value to your site. For example, you can create shortcodes or build a custom settings page for your plugin.
Creating Shortcodes
Shortcodes are text snippets in square brackets like [my_shortcode] that insert content wherever you place them. They're great for text, notices, or recurring elements in the editor.
Once you've created the my_shortcode_text function, add the shortcode [my_shortcode] to any post or page. WordPress will replace it with the corresponding HTML content when the page loads.
Settings Page in the WordPress Backend
Once your plugin requires configurable content (such as text, colors, or other options), it's worth creating a dedicated settings page. The following example uses the WordPress Settings API and saves a text value as an option:
This creates a new page under "My Plugin" in the WordPress settings that contains an input field:
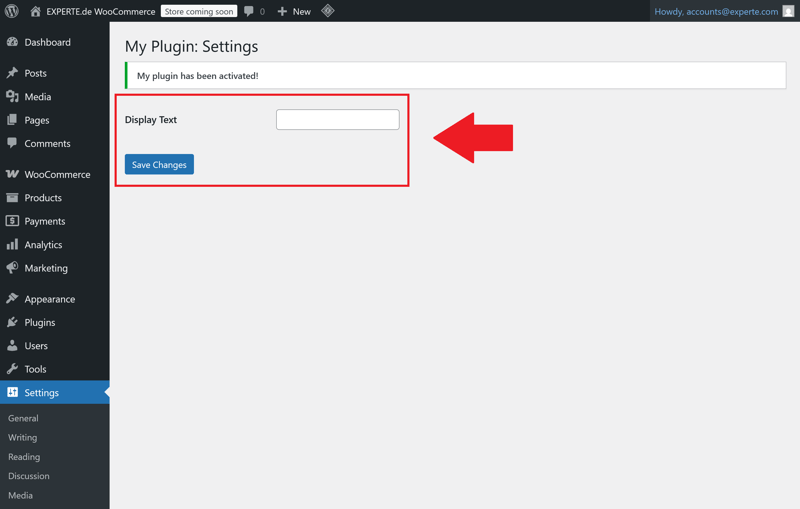
A simple settings page is quick to set up.
Plugins With Multiple Files
A WordPress plugin typically consists of multiple files. Once you go beyond just a few functions, a clear structure becomes important. Here's what a typical, well-organized plugin structure looks like:
This structure follows a common standard used by many WordPress plugins. It separates admin code (like menus and settings) from frontend code (like shortcodes and widgets), making it easier to manage updates and extensions.
Moving PHP Code to Separate Files
Move functions from your main file into separate files in the includes/ directory and load them with include_once. This keeps your code organized, shortens your files, and reduces redundancy as your codebase grows.
Enqueue CSS and JavaScript the Right Way
Don't add CSS and JavaScript files manually using <link> or <script> tags. Instead, use the WordPress functions wp_enqueue_style() and wp_enqueue_script():
Important: Use plugin_dir_url(__FILE__) to generate paths dynamically. This keeps your plugin independent of the WordPress installation directory.
Follow Best Practices
The larger your plugin grows, the more important it becomes to work in a structured and forward-thinking way. Even with small extensions, you should follow proven guidelines from the start.
This helps you avoid technical issues and makes future maintenance, updates, and publishing much easier. The following best practices are a great starting point.
Avoid Generic Function Names
Avoid function names like load_settings() or save_data(). A WordPress site can run dozens of plugins at once, and naming conflicts are a common source of errors.
Use unique naming conventions instead:
For larger projects, you can also use namespaces:
Protect Every PHP File From Direct Access
Prevent direct access to your files via the browser by adding a check at the beginning of every PHP file to verify that WordPress is loaded:
This condition stops anyone from calling your file directly in the browser and potentially running unsecured functions.
Validate Input and Escape Output
Use WordPress core functions to sanitize user input:
Action | WordPress Function |
|---|---|
Validate text | sanitize_text_field() |
Validate URLs | esc_url_raw() |
Output HTML | esc_html() |
Escape attributes | esc_attr() |
Secure SQL queries | $wpdb->prepare() |
Unfiltered input is a serious security risk. You can avoid vulnerabilities like XSS, CSRF, or SQL injection by consistently validating all data.
Always Use the WordPress APIs
For database access, form fields, options, and user roles, always rely on the WordPress core APIs. These functions are not only more secure but also future-proof:
get_option(), update_option()
wp_nonce_field(), check_admin_referer()
$wpdb->insert(), $wpdb->prepare()
Avoid direct database queries using mysqli_query() or mysql_query(). These methods are insecure and deprecated in modern versions of WordPress.
Plan for Internationalization Early (i18n)
If you plan to offer your plugin in multiple languages, build in internationalization from the start:
- 1.
Add the field "Text Domain: my-plugin" to the header (this is the identifier for translations)
- 2.
Use __() and _e() for all text strings
- 3.
Place .pot/.mo/.po files in the languages/ folder
This ensures your plugin is compatible with popular translation tools like Loco Translate or WPML right from the start.
Document and Maintain Your Plugin Regularly
Document your code with clear comments. This makes things easier not just for you, but also for future users and contributors.
If you plan to publish your plugin, it's also a good idea to include a structured readme.txt file that follows the WordPress plugin directory format.
An unmaintained plugin becomes less reliable with each new WordPress release. Plan for regular testing and updates, at least with every major core update.
Conclusion: More Control Through Custom Plugins
The foundation is now in place: you've created your first WordPress plugin and taken a major step forward. You now understand not only how WordPress works, but also how to extend it to fit your needs. That's what separates users from developers.
A custom plugin gives you more control over your website and makes you less dependent on bloated third-party extensions. You decide what happens, when it happens, and how it works.
What's next? With the basics covered here, you now have a solid foundation to build on. You can now explore more advanced concepts like:
Custom Post Types
Custom Gutenberg blocks
Multisite compatibility
Plugin deployment via GitHub or WordPress.org
WordPress gives you all the tools you need. If you work in a structured way and follow best practices, you can continue improving your plugin step by step.