How to Use OneDrive in 2026: A Complete Beginner's Guide


If you're on Windows, you're probably already using OneDrive. But do you actually know how it works, or are you missing out on some of its most useful features?
From initial setup to daily use, we’ll show you how to master OneDrive so your files stay secure, organized, and available wherever you go.


What Is OneDrive?
OneDrive is Microsoft's official cloud storage service. It lets you store documents, photos, videos, and other files online, so you can access them from anywhere. You can also share files with others and collaborate on them in real time.
OneDrive is tightly integrated with Windows and Microsoft 365 apps like Word, Excel, and PowerPoint. This lets you save files to the cloud directly from these apps, keep them synced across your devices, and continue working wherever you left off.
OneDrive is free and comes pre-installed on every Windows PC. The free plan includes 5 GB of cloud storage, which is enough for basic use. If you need more space, you can upgrade to a paid Microsoft 365 subscription.
How Does OneDrive Work?
OneDrive works much like other cloud storage services, such as Dropbox or Google Drive. Instead of files being stored strictly on your hard drive, they're saved to a secure cloud server and synced automatically. Any changes you make are updated in real time, ensuring you always have the latest version of your files, whether you're on a PC, smartphone, or tablet.
Here’s a quick walkthrough (with screenshots) to show you how OneDrive works in practice and what you can do with it.
Downloading and installing OneDrive
OneDrive comes pre-installed on most Windows devices, but you'll need a Microsoft account to use it. If you already have a Microsoft account (for example, from using Outlook or Skype), you can use it for OneDrive as well. If not, you'll need to create one first. Here's how.
Check if OneDrive Is Installed
Since OneDrive is built into Windows 10 and 11, it is likely already on your device. To check, click the search bar in the taskbar and type “OneDrive.”
If OneDrive is installed, it will show up in the search results. If not, you can download it from the Microsoft website.
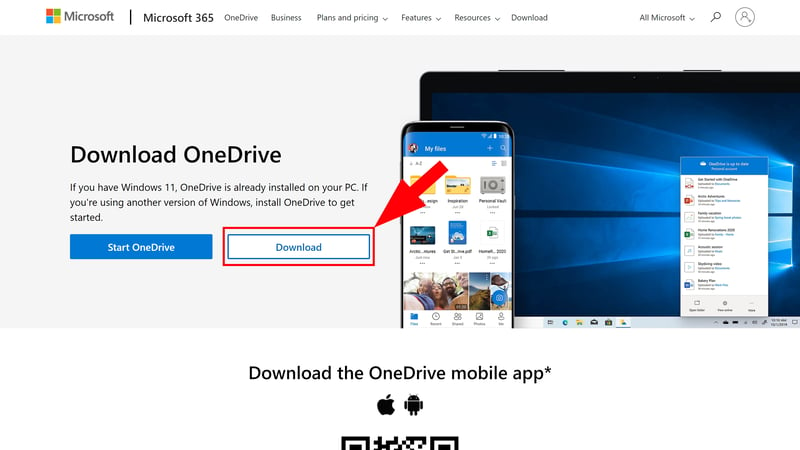
Download OneDrive if it isn't installed yet.
Create a Microsoft Account
As mentioned, you need a Microsoft account to use OneDrive. If you don't have one yet, head to the Microsoft website to create one:
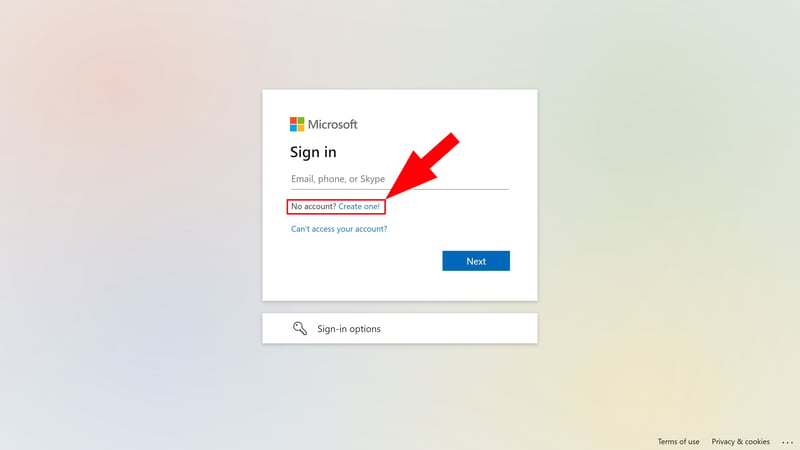
Create a Microsoft account or sign in.
Setting up and navigating OneDrive
Once you have your account ready, you can sign in to OneDrive using your login credentials. There are three main ways to access your cloud storage: through a web browser, the desktop app, and the smartphone app.
OneDrive on the web
The web app is the most flexible way to access your files. You can log in from any web browser and manage your storage from anywhere, provided you have an internet connection.
The web interface is very intuitive. It's divided into three main sections:
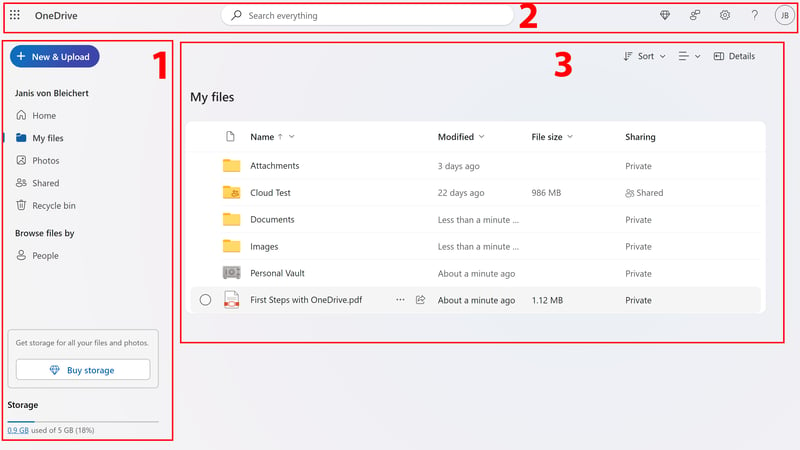
The Microsoft OneDrive web interface.
- 1.
Left sidebar: This is your main navigation area. Use it to switch between sections like Home, My files, Photos, Shared, and the Recycle bin. At the top, the “New & Upload” button lets you create folders or upload files to OneDrive.
- 2.
Top menu bar: The search bar lets you quickly find files and folders stored in your OneDrive. On the left is the app launcher, while the icons on the right provide access to settings, help, your account, and other Microsoft services.
- 3.
Main area: This is where your files and folders are displayed. You can sort, filter, switch views, and manage your files from the toolbar above the file list.
OneDrive on the desktop
You don’t even need to open a browser to access your files; you can manage them directly through the Windows File Explorer. Just look for the cloud icon in your system tray (the bottom-right corner of your taskbar).

You'll find the OneDrive app in the system tray.
When you open the app for the first time, you'll need to sign in to link your account. Simply enter your credentials and follow the on-screen instructions.
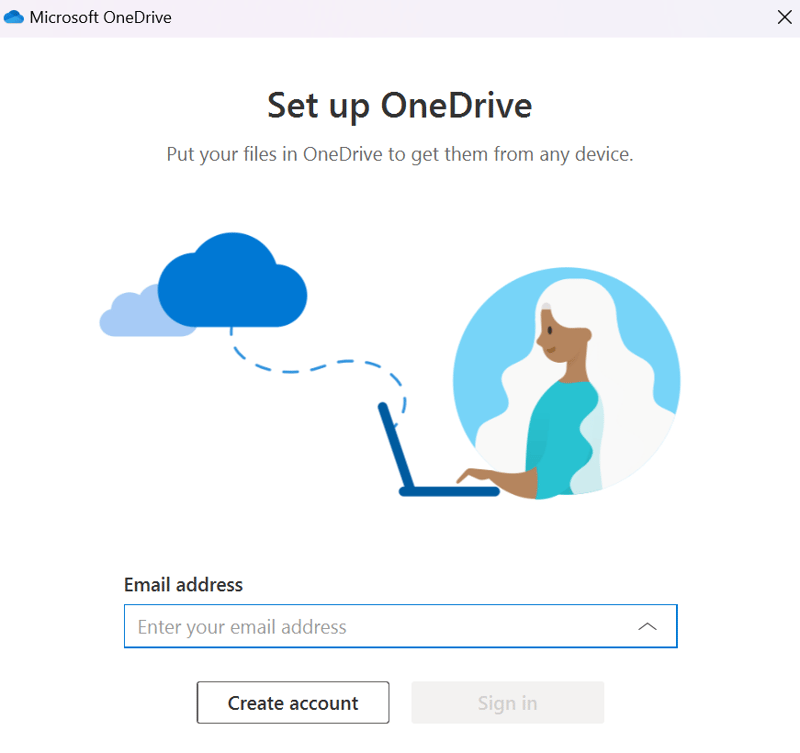
Sign in with your Microsoft credentials.
During setup, you can choose exactly where your OneDrive folder will live on your computer.
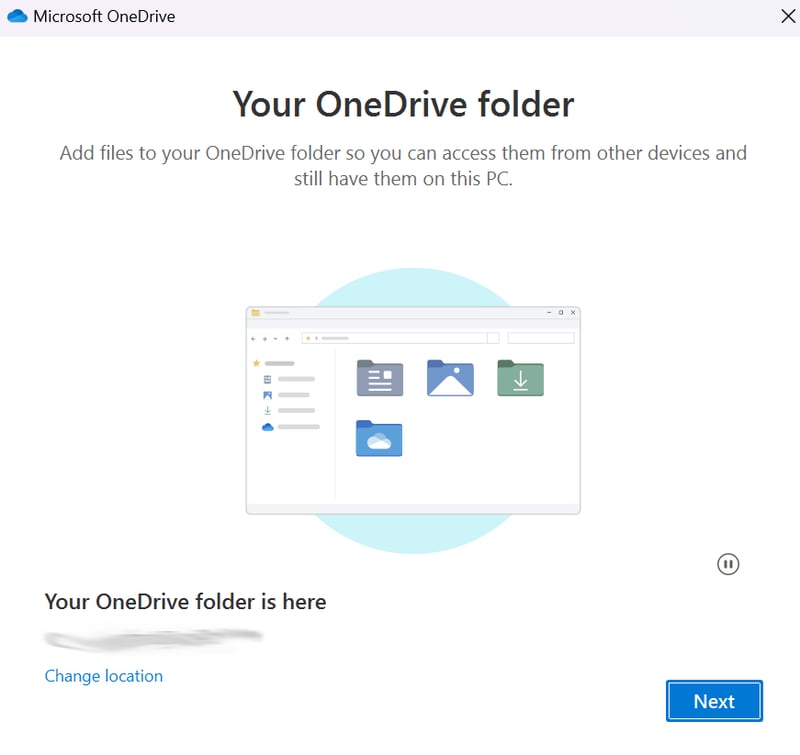
Choose a location for your OneDrive folder.
Once set up, your OneDrive folder will appear in File Explorer just like any other folder on your hard drive, allowing you to drag and drop files directly into the cloud.
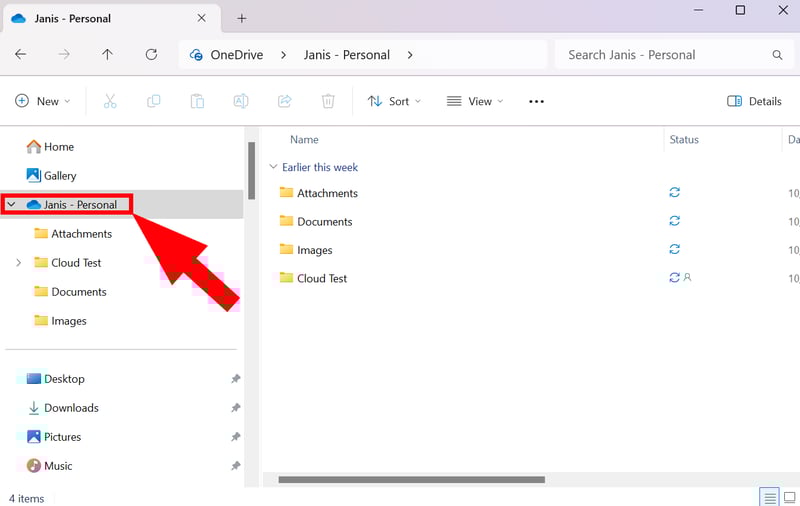
Your OneDrive folder now appears directly in File Explorer.
OneDrive on Your Smartphone
Microsoft also offers a mobile app that lets you open and edit files on the go. It includes several handy extras: you can use your phone’s camera to scan physical documents, for example, and save them directly as PDFs to your cloud storage.
The OneDrive app interface is very intuitive:

The OneDrive app is available for Android and iOS devices.
- 1.
Top menu bar: This contains your profile and shortcuts for common actions. You can create new files or folders, search your OneDrive, cast media to compatible devices, or upgrade your storage.
- 2.
Bottom navigation menu: Use these tabs to switch between the main areas of the app, such as Home, Files, Shared, Photos, and Me, where you can access your account and app settings.
- 3.
Main area: This is where your files and folders are displayed. The content changes depending on the section you've selected. For example, “Home” shows recent and offline files, while “Files” lets you browse everything stored in your OneDrive.
- 4.
Scan button: Tap the floating Scan button to use your camera to scan documents, take photos, or capture whiteboards and save them directly to OneDrive.
Setting up sync and offline access
Files in OneDrive sync automatically across all your devices, ensuring you always see the latest version of your work. However, because syncing requires an internet connection, there's a difference between accessing your files through a web browser and using the dedicated apps.
Syncing in the web app
When using the web app, you're (usually) working directly in the cloud. Every change you make is saved instantly and reflected across all your connected devices.
OneDrive now offers an offline mode for the web app, though it's currently limited to Microsoft 365 subscribers with work or school accounts. This feature requires the OneDrive desktop app to be installed; it uses local caching to make your files accessible in the browser even when you lose your internet connection.
Syncing on the desktop
On desktop, OneDrive offers two different ways to manage file storage and syncing. You can switch between them in the OneDrive settings under “Sync and backup” > “Advanced settings”.
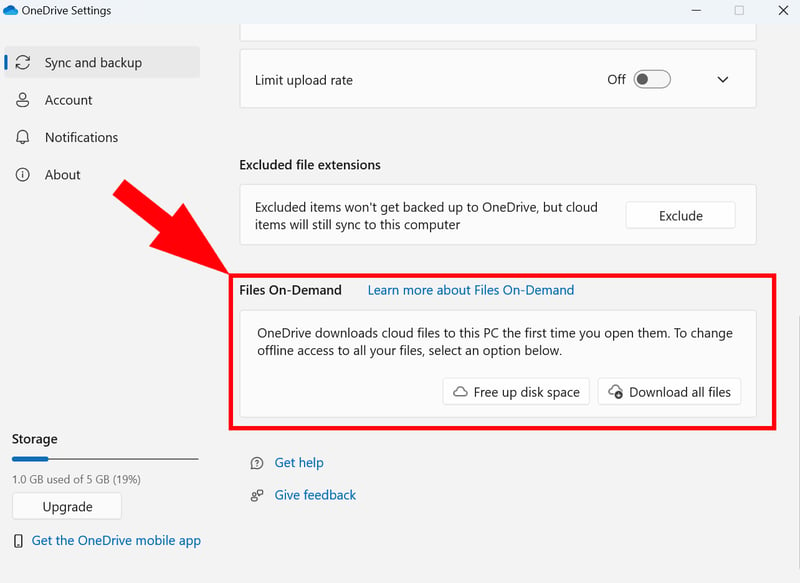
You can stream files from the cloud or download them to your device.
- 1.
Files On-Demand: By default, all your OneDrive files and folders will appear in File Explorer, but they aren't actually taking up space on your hard drive. They only download when you open them. This is great for saving disk space, and changes sync automatically whenever you're online.
- 2.
Local storage: By selecting “Download all files”, you can keep a physical copy of every file on your device. This allows you to access everything anytime, even without an internet connection. Any edits you make while offline will sync the moment you reconnect.
You can also keep specific files or folders permanently on your device without downloading everything. Just right-click a file and select “Always keep on this device”:
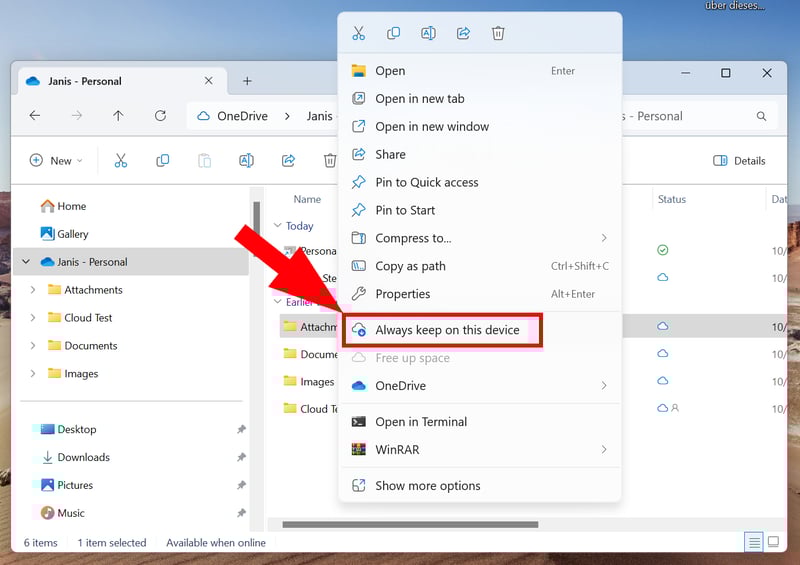
You can save cloud files and entire folders to your device.
Syncing files on your smartphone
Syncing on the OneDrive mobile app works much like it does on desktop, keeping your files up to date across all your devices.
You can also make individual files available offline. These are downloaded to your phone's storage, allowing you to access them without an internet connection. Any changes you make while offline are synced automatically the next time your device connects to the internet.
In the app's settings, you can also choose whether OneDrive syncs offline changes over Wi-Fi only or is allowed to use cellular data.

If you want to conserve mobile data, enable Wi-Fi-only syncing.
Sharing files and folders
One of the main reasons people use cloud storage services like OneDrive is to share files with others. Whether you're collaborating with coworkers or sharing photos with friends and family, the process is quick and straightforward.
Sharing on the web
Step 1: Open OneDrive in your browser and navigate to the file or folder you want to share.
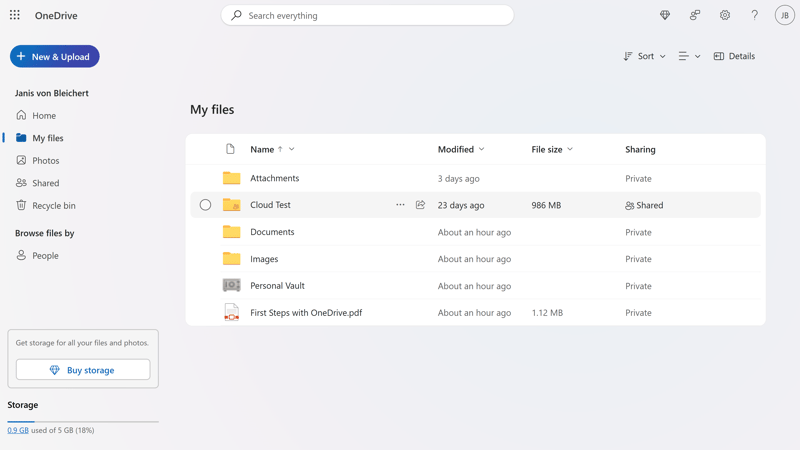
You can share folders and files with others.
Step 2: Right-click the item and select “Share.” Alternatively, you can click “Manage Access,” which takes you directly to the permissions screen.
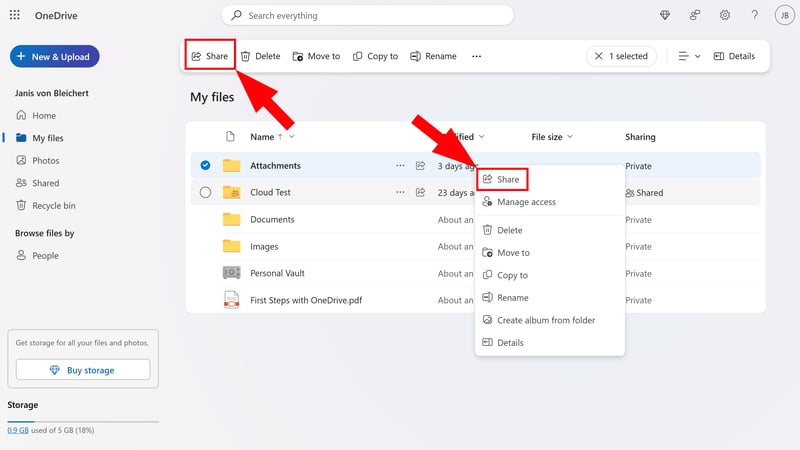
Select a folder or file and click “Share.”
Step 3: Choose how you want to share the file. You can create a shareable link or invite people by email. You can also choose whether recipients can edit the file or only view it, and manage who has access.
Sharing on the desktop
You can also share files directly from File Explorer without ever opening your browser.
Step 1: Locate the folder or file in your local OneDrive folder.
Step 2: Right-click the item. In the menu, you can hover over the OneDrive icon to see quick options, or simply click the “Share” icon. This will open the same sharing interface used on the web.
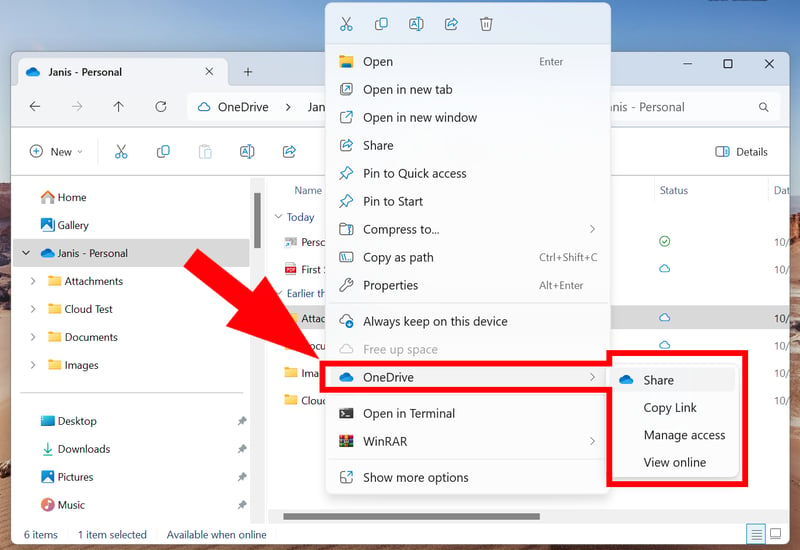
Share documents and folders directly from your desktop file manager.
Step 3: Just like the web version, you can invite people via email, copy a link, or adjust access permissions. Once finished, click “Send.”

The sharing options are the same as on the web.
Sharing on your smartphone
Sharing is just as easy on the go using the mobile app.
Step 1: Open the OneDrive app and find the file or folder you wish to share.
Step 2: Tap the three-dot icon (⋮) next to the file to open the options menu, then select “Share.”

Tap “Share.”
You can also long-press a file to select it, then tap additional files to share multiple items at once. After selecting your files, tap the Share icon at the top of the screen.

You can share multiple folders or files at once.
Step 3: Choose your preferred sharing method. You can copy a link to your clipboard or use shortcuts to send the file directly through apps like Outlook, WhatsApp, or Teams.

Choose how you want to share the file.
Step 4: If you choose "Invite people," enter the email addresses and tap the Send icon in the top-right corner. You can manage permissions and add a note here as well.

You can add a note to your sharing invitation.
Deleting files and folders
Thanks to automatic syncing, you only need to delete a file once for it to be removed from the cloud and all your connected devices simultaneously.
Note: Deleting files and folders doesn’t permanently erase them right away. We’ll cover how to recover files in the next section.
Deleting on the web
On the web, you have two easy ways to delete items:
- 1.
Select the file or folder and click “Delete” in the top menu bar.
- 2.
Right-click the item and choose “Delete” from the context menu.
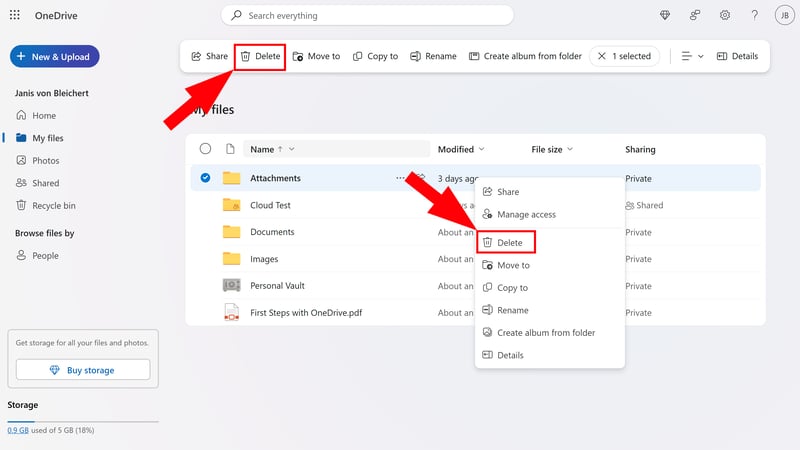
Move files or folders to the recycle bin.
Deleting on the desktop
On your computer, you can delete OneDrive files just like any other file. Simply right-click the item and select “Delete,” or highlight it and press the Delete key on your keyboard.
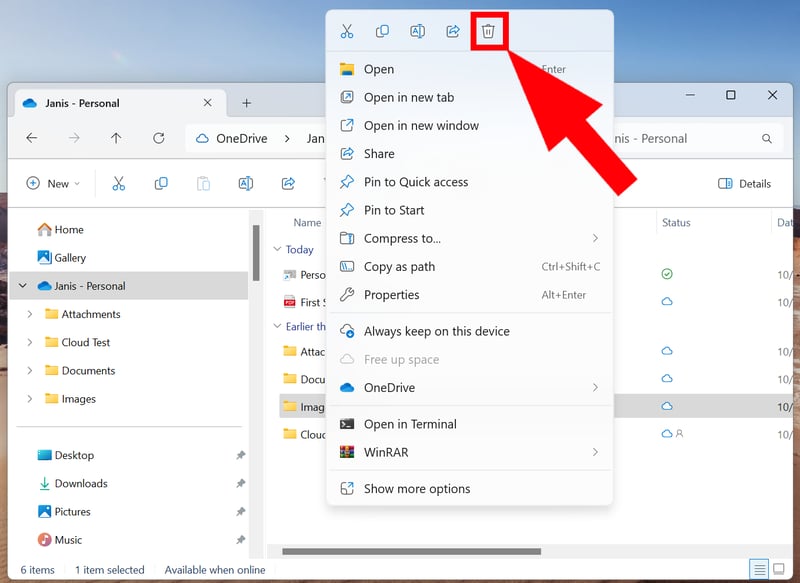
Just delete files as usual in the File Explorer.
Keep in mind: When you delete files from your OneDrive folder, they are sent to the OneDrive Recycle Bin in the cloud rather than just your computer's local Recycle Bin. This ensures they are removed from all your synced devices as well.
Deleting on your smartphone
To delete a file or folder, tap the three-dot menu next to it and select “Delete.”

You can also delete files from the smartphone app.
To delete multiple items at once, tap and hold a file to enter selection mode, select the remaining files or folders, then tap the trash icon in the top-right corner.
Restoring deleted files
When you delete a file or folder, it isn't fully erased immediately. Instead, it's moved to the Recycle Bin, where it's kept for 30 days before being permanently deleted. During that time, you can restore it at any time from either the web interface or the OneDrive smartphone app.
Restoring deleted files on the web
Step 1: Open the OneDrive web interface and select “Recycle bin” from the left menu.
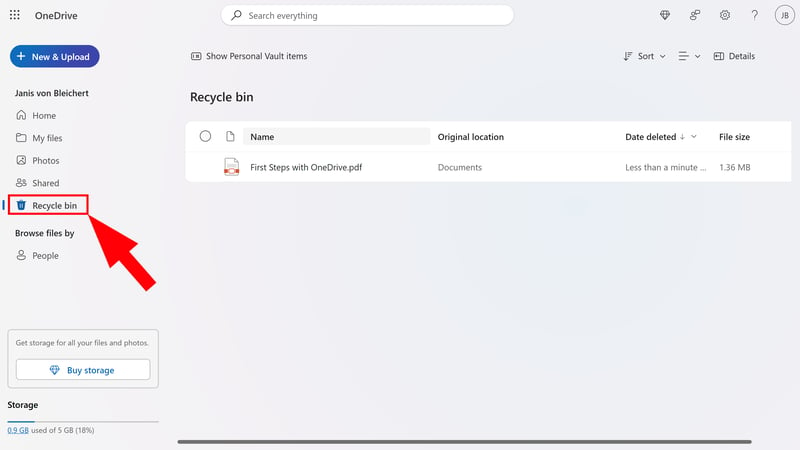
Open the Recycle Bin.
Step 2: Select the file or folder you want to restore and click “Restore.”
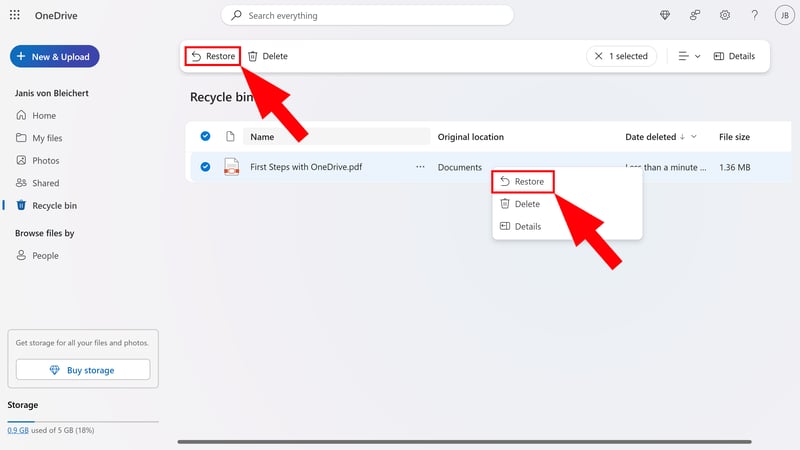
Restore the file you need.
The file or folder will be restored to its original location.
Files in your Recycle Bin also have a “Delete” option. If you select it, the files are permanently removed from your cloud storage and can’t be recovered, even within the 30-day window.
Restoring deleted files on your smartphone
To access the Recycle bin in the smartphone app, open the “Me” tab:

Open the Recycle bin in the smartphone app.
Select the file or folder you want to un-delete, then tap “Restore.”
Canceling OneDrive and deleting your account
If you're paying for extra storage through a Microsoft 365 subscription, you can simply cancel your subscription. Your Microsoft account will remain active, and you'll still have access to the free 5 GB of OneDrive storage.
If you want to remove OneDrive completely, you'll need to delete your Microsoft account. This permanently deletes your OneDrive account and all other Microsoft services linked to it.
Here's how to do both:
How to cancel your Microsoft 365 subscription
Step 1: Go to your Microsoft account dashboard. In the web app, click your profile icon in the top-right corner and select “My Microsoft account.”
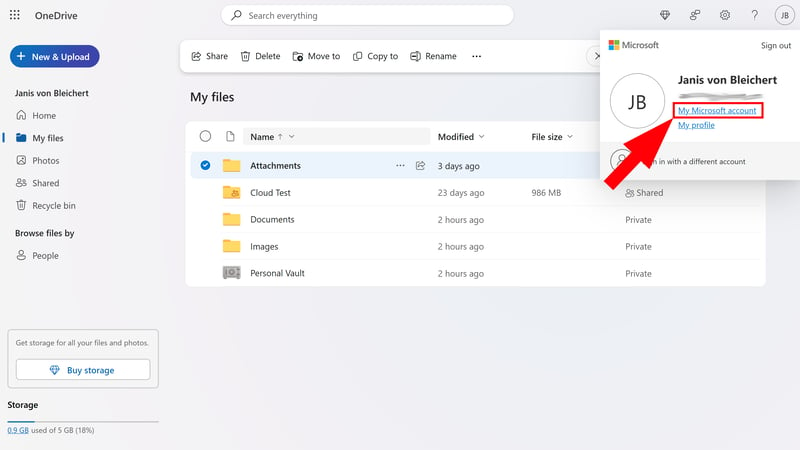
Go to your account page.
Step 2: Select “Services & subscriptions” in the navigation menu on the left. If you have an active Microsoft 365 plan, you can manage or cancel it here.
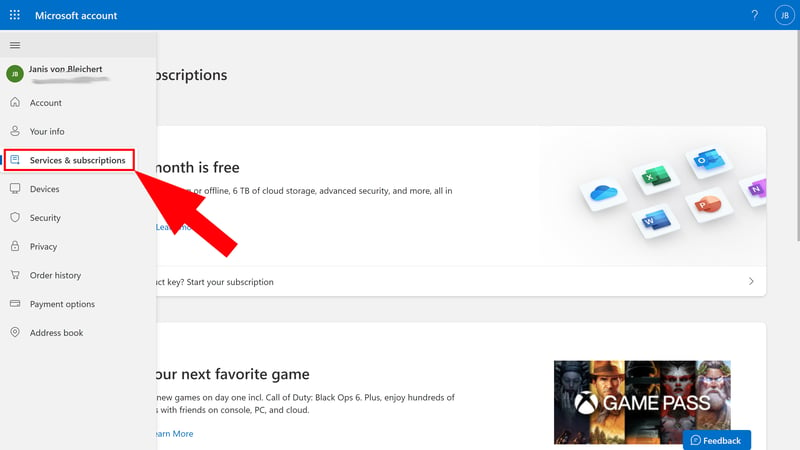
Open your services and subscriptions.
Once your subscription ends, your storage will revert to the free 5 GB limit. If your files exceed this 5 GB limit, you will no longer be able to upload new content or sync changes.
To avoid losing data, you must free up enough space or move your files elsewhere. If an account remains over its storage limit for an extended period, Microsoft may eventually delete the OneDrive and all files within it (typically after six months of inactivity).
How to delete your Microsoft account
If you no longer need your Microsoft account and want to delete it along with your OneDrive data, follow these steps:
Step 1: In your account settings, navigate to “Your info” in the left-hand menu.
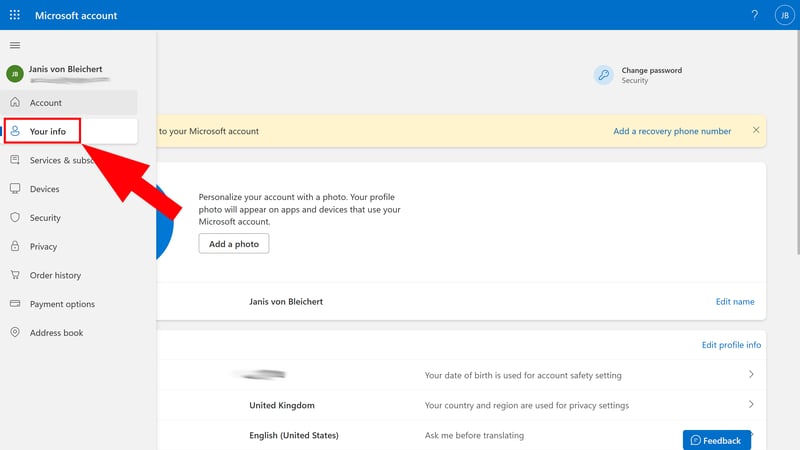
Open your info in the settings.
Step 2: Scroll down to the “Account info” section and select “Close account.”
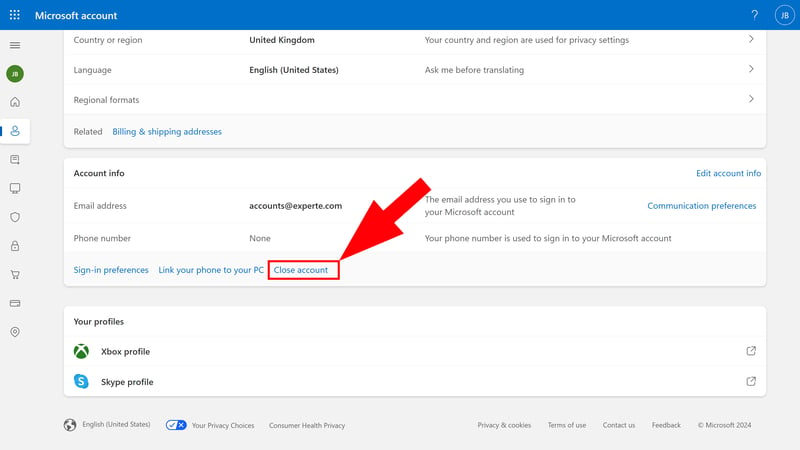
Navigate to the account closure option.
Step 3: You’ll be directed to a Microsoft support article explaining the process of closing your account. Click the “Close account” button within that article to proceed.
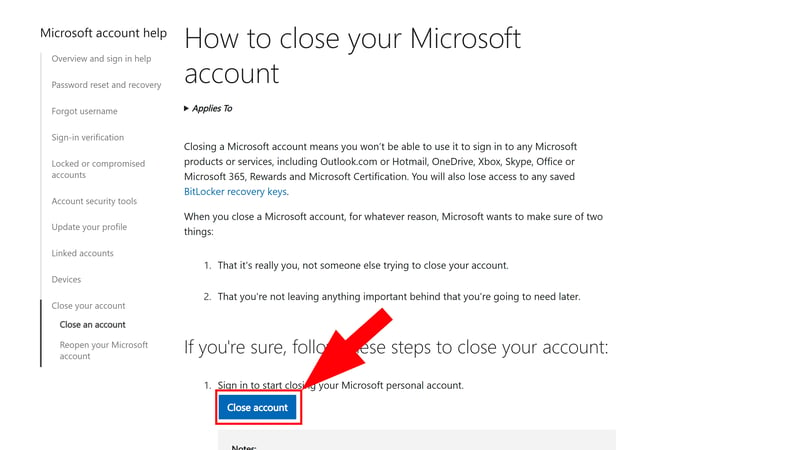
Closing your account is a multi-step process.
Step 4: You’ll be asked to sign in again and verify your identity using two-factor authentication (such as a code sent to your phone or email). This ensures that only the account owner can initiate a deletion.
Step 5: Follow the on-screen instructions. You can choose how long Microsoft should wait before permanently closing your account: 30 or 60 days. Then, click “Next.”
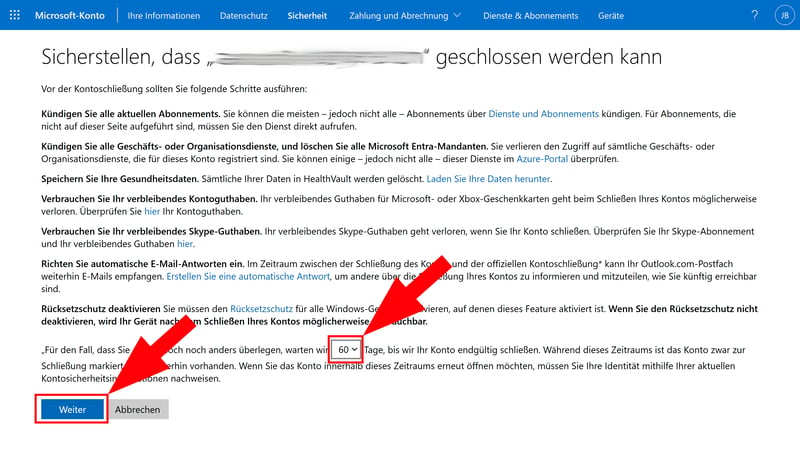
Choose when the account closure should take effect.
Step 6: Next, you’ll need to check several boxes to acknowledge that you understand the consequences of closing your account (such as losing access to Outlook or Xbox data). Provide a reason for leaving, then click “Mark account for closure.”
Your account will be permanently deleted after the waiting period (30 or 60 days) you selected. If you change your mind during that time, you can restore your account simply by signing back in and verifying your identity.
Frequently Asked Questions
Still have questions about Microsoft OneDrive? Here are quick answers to some of the most common questions:
What do the OneDrive icons mean?
OneDrive uses specific icons in the taskbar, notifications, and File Explorer to keep you informed about your sync status. Here are the most important ones:

This means there is new information or a feature update available. Click the icon to see the messages or any required actions.

This indicates that a file or folder cannot be synced. Click the icon to view the error details and learn how to fix it.

This means OneDrive isn’t running or you aren’t signed in. Open the OneDrive app from the Start menu to resolve this.

A pause symbol means syncing has been manually stopped. Click the icon and select “Resume syncing” to continue.

This indicates that syncing is currently in progress. Files are either being uploaded to the cloud or downloaded to your device.

This means your account has been blocked, which usually happens if you have exceeded your storage limit for too long.

This appears when your account needs attention. Click the icon to see the specific alert in the Activity Center.
You can find a complete list of OneDrive icons on the Microsoft website, with detailed explanations and helpful links.
What is the “Personal Vault” in OneDrive?
The Personal Vault is a protected area within your cloud storage designed for your most sensitive files. To open it, you must pass an additional identity verification step through two-factor authentication, such as a fingerprint, face scan, PIN, or a code sent via email/SMS.
This provides an extra layer of security in case someone gains access to your device or account.
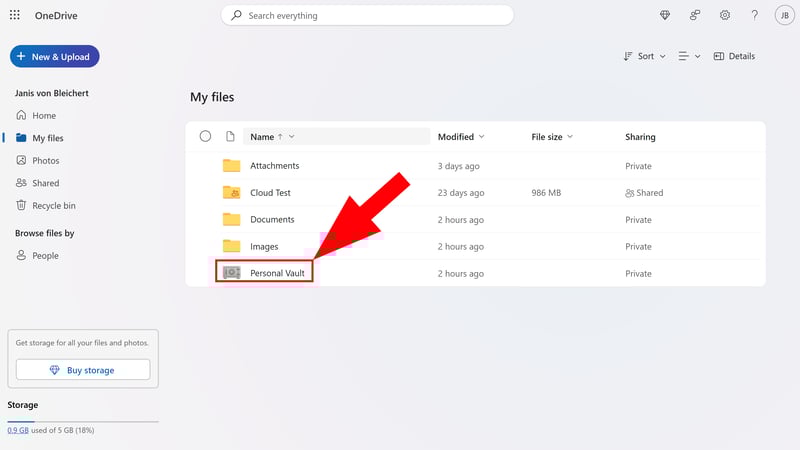
Your Personal Vault is a protected area within your OneDrive.
Files in your Vault are private and cannot be shared; if you need to share a file, you must move it out of the Vault first.
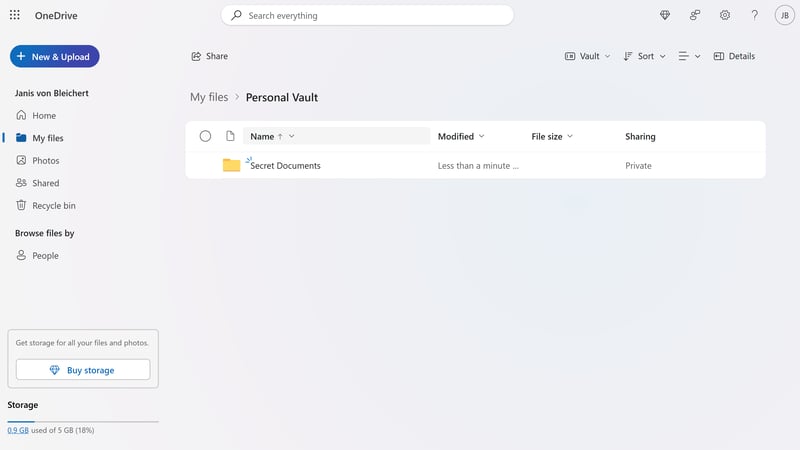
Store sensitive files in your vault.
In your Microsoft account settings, you can choose which verification method you’d like to use to access your vault.
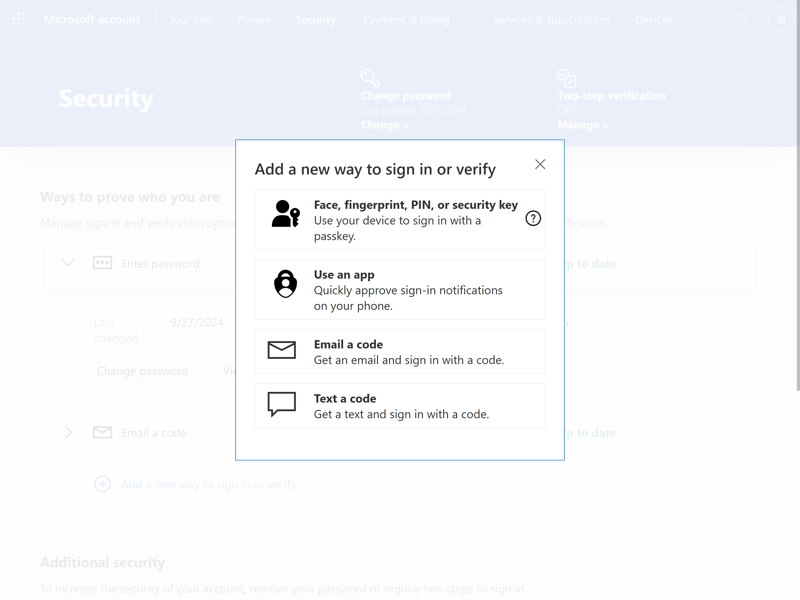
You can choose from several verification methods.
Can I have multiple OneDrive accounts on one PC?
It depends on the type of account. You can link multiple school or work accounts to the same PC, but Windows only allows one personal OneDrive account to be synced via the desktop app at a time.
While you can create multiple personal Microsoft accounts (each with 5 GB of free space), you would have to sign out of one to sign into the other on your desktop, or access the second account via a web browser.
Why isn’t OneDrive syncing?
If OneDrive isn’t syncing properly, it might be due to one of the following:
No internet connection
OneDrive requires an active connection to sync. Check your Wi-Fi or Ethernet and restart the app if needed.You’re signed out
Syncing stops if you aren't logged in. Click the OneDrive icon in the taskbar and sign back in.The desktop app isn’t running
Ensure the app is active; if you don't see the cloud icon in your taskbar, open the app from the Start menu.Files are too large
OneDrive has a maximum file size limit of 250 GB per file.Your storage is full
If you’ve reached your storage limit, syncing will be disabled until you delete unnecessary files or upgrade your plan.Syncing is paused
You may have accidentally paused the process. Click the OneDrive icon and select “Resume syncing.”
You can find a complete list of possible issues with detailed troubleshooting steps on the Microsoft website.