High-Resolution Screenshots: How to Create High-Resolution Screenshots Without a 4K Monitor

High-resolution images in 4K format are a must for professional websites these days. However, not everyone has a UHD display. Fortunately, you can still capture 4K quality screenshots with a conventional monitor. Below, we'll introduce you to two simple methods for how to do this.
Why Do I Need High-Resolution Screenshots?
In the past, images that were 200 pixels wide were enough for blogs and online articles—but those days are gone. UHD 4K monitors now come with a resolution of 3,840 x 2,160 pixels and typically have over 200 pixels per inch (ppi), meaning that images should have a similar resolution. The higher the ppi, the sharper the graphic appears. To illustrate, an image with 300 ppi will appear razor-sharp, whereas one with 30 ppi looks pixelated.
Another related (but less significant) term is device pixel ratio (DPR). This measurement indicates the ratio between CSS pixels (the pixels in HTML code, which is a simple unit of measurement) and the physical pixels (the actual pixels that a device is capable of displaying). For example, if you zoom in on an image with a size of 200 CSS pixels, it takes up more space on the screen. The width in physical pixels increases, but the image remains at 200 CSS pixels. As a result, the CSS pixels are stretched, rather than enhanced. The closer you zoom in, the more physical pixels fit into a CSS pixel.
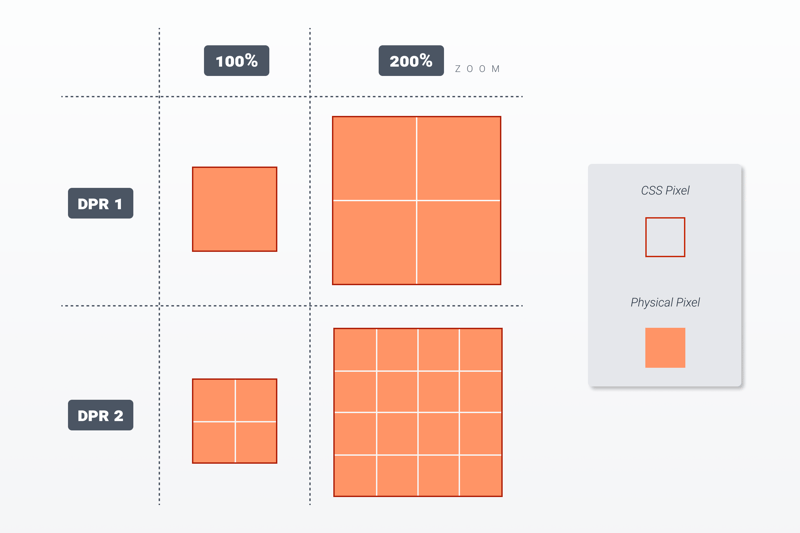
The higher the DPR, the more physical pixels make up a CSS pixel. A screen is considered high-resolution starting at a DPR of two.
Conventional screens have a DPR of one; one CSS pixel is represented by one screen pixel. Screens with a DPR of three have three screen pixels for every CSS pixel. Today, high-resolution screens can reproduce details much better, however, if the image doesn't contain enough information, it will appear blurry even on a 4K display. Just imagine trying to enlarge a small passport photo and reproduce it on a giant screen; the original photo wouldn't contain enough detail to fill in all the pixels, so the result would look terrible.
Pixelated photos can kill a website's credibility, so do everything you can to upload high-resolution screenshots. The problem is that many low and mid-priced laptops and monitors are still only equipped with full HD displays (1920 x 1080 pixels). If you create a screenshot in Windows (Alt+Print), it will only have as many pixels as your screen.
However, that doesn't mean you have to buy expensive hardware to take high-resolution screenshots. In this article, we'll cover two methods you can use to achieve great results with conventional displays.
Method 1: High-Resolution Screenshots in Your Browser Using Google Chrome's Developer Tools
Thanks to Google Chrome, it's possible to take high-resolution screenshots even with a conventional full HD monitor. Here's how it works:
- 1.
Click on the kebab menu (three vertical dots) in the top right, and then on More tools > Developer tools.
- 2.
In the top bar, click on Toggle device toolbar (the cell phone icon). This tool is used to display the screen in a different format—for example, that of an iPhone screen.
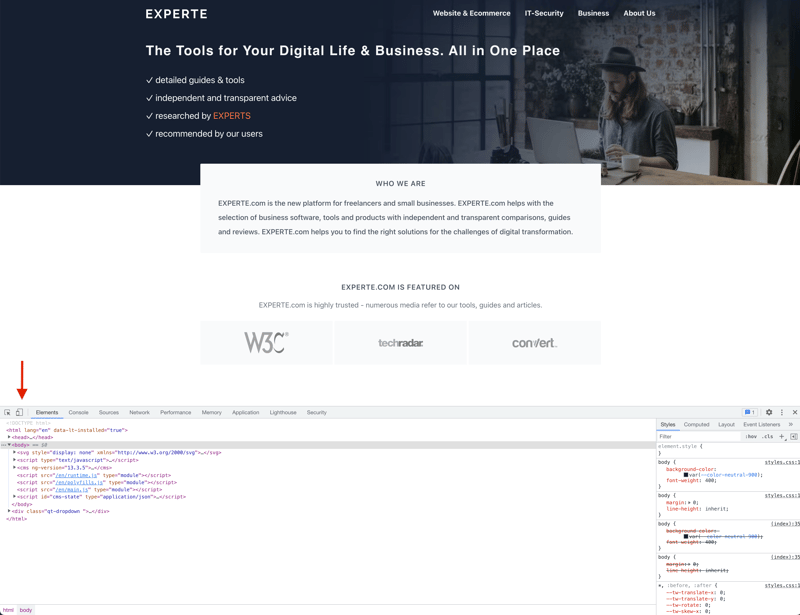
Google Chrome's developer tools can be used to simulate different screen settings.
3. You can now define your device instead of using the default devices. Click on the preset device in the top bar, open the curtain menu, and select Edit.
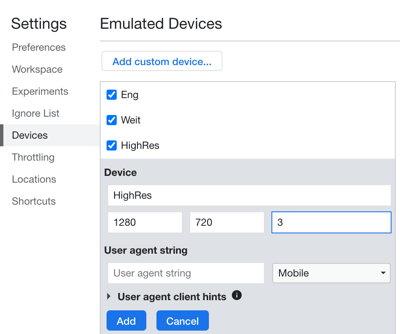
4. Select Add custom device and create a new one. First, add a name under Device Name (e.g., "4K Display"). The bottom three fields specify the target device's resolution (width x height) and DPR. For example, for a 12-inch screen, you'd set the values 1024 x 768 and a DPR of three.
You can define more than one device as well as other formats. For instance, mobile for an HD smartphone display (1280 x 720 pixels). Ensure that all content fits in the image without looking compressed.
5. The newly created virtual device 4K display is now saved. When you open a new tab, any page can be displayed with the set DPR; simply open the developer tools and select 4K Display.
6. To capture a screenshot, click on the kebab menu in the top right and then on Capture Screenshot.
7. The browser saves the screenshot and automatically downloads it to your default download folder.
Method 2: High-Resolution Screenshots With HDMI Dummy
The method covered above only works to take screenshots of web pages in your browser. For apps, there's another option, however, you'll need an "HDMI dummy". This small plug with an HDMI connection simulates a screen and can be purchased for about $10. Ensure that the resolution is really 4K before you buy it. Once you've plugged the dummy into the computer's HDMI socket, take the following steps:
- 1.
Set up a second screen in Windows under Settings > System > Display. Scroll down to Multiple displays and select Extend these displays from the drop-down menu.
- 2.
Two monitors (1 and 2) should now appear at the top of the display. You won't be able to see anything on the second one, as it isn't a real display. You will be able to take screenshots, however.
- 3.
In the newly set up dummy monitor (usually number two), choose the correct setting (see image below). Ideally, it would be 3840 x 2160 (4K).
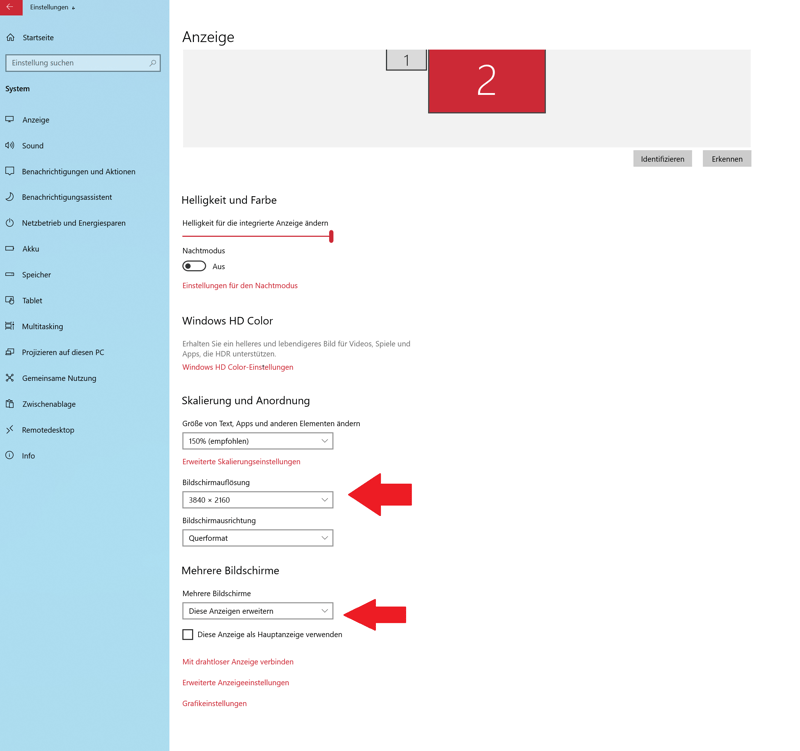
The HDMI dummy simulates a second high-resolution monitor.
3. To take a screenshot of an app, open the desired application in full-screen mode.
4. Hold down Windows+Shift+Right Arrow Key to move the app to the second screen. The window will no longer be visible.
5. Hold down Windows+Print. Your system will automatically take a screenshot of both monitors and save it to your clipboard as well as under Your PC > Pictures > Screenshots.
6. Open the screenshot in the folder or hold CTRL+V to paste it into an image editor (e.g., GIMP or Paint). Remove any parts you don't need.
Conclusion
You don't need to buy an expensive monitor to take a high-resolution screenshot. For screenshots inside your browser, Google Chrome's developer tools offer an excellent way to define different DPRs and pixel widths. If outside the browser, in another app, an HDMI dummy provides an inexpensive solution to capture screenshots with a higher pixel width than your screen.
Unfortunately, it's impossible to take screenshots with expanded task menus using either method. If you need this kind of image, you'll have to source an appropriate monitor with the correct resolution.